Introduction
The Vendor Form – Additional Info Tab is used to store a variety of miscellaneous vendor information. This is also where users control the pop-up notes for the vendor.
Form Access
-
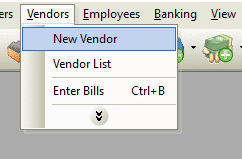
From the main menu, click Vendors | New Vendor, or

-
From the toolbar, click the Add New Vendor button.

Vendor Form – Additional Info Tab – Field Definitions

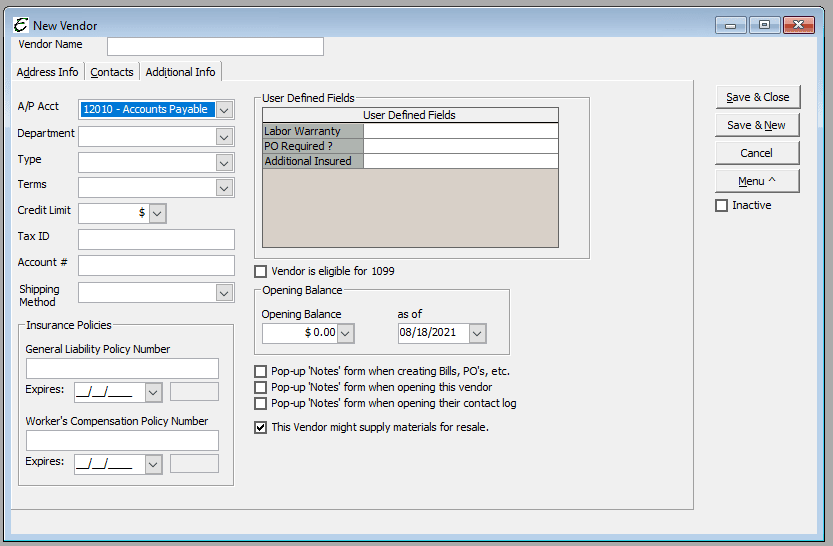
- A/P Account – Select from the drop down menu the Accounts Payables account to use when transactions with this vendor take place.
- Department – Select from the drop down menu the corresponding department the vendor would be associated with.
- Type – Select from the drop down menu the type of vendor you are setting up, subcontractor, Utility, Advertising, Equipment, and Parts etc. You may also create a new Vendor Type, if the type you need is not in the list. Click on the hand icon to the right of the Type field and Add A Vendor Type.
- Terms – Select from the drop down menu the Terms the vendor is offering you on their invoices, 2% 10 Net 30 Days, Net 15 Days etc. You may also create a new Term, if the Term you need is not in the list. Click on the hand icon to the right of the Term field and Add A Term.
- Credit Limit – Enter the credit limit the vendor has extended to your company.
- Tax ID – Enter the vendor’s Tax ID number if applicable. Will you be sending them a 1099? If yes, you will need to obtain their Tax ID number.
- Account Number – The account number the vendor has assigned to our account with their company.
- Vendor eligible of 1099 – When ticked, this checkbox indicated the vendor is eligible to receive Internal Revenue Service form 1099. Example: Subcontractor.
- Opening Balance – Amount of money YOU OWE the vendor as of the “As Of” date noted below. Use this if you have NOT entered every single bill into Total Office Manager that has NOT been paid.
- As Of Date – The date that you own the money.
- User Defined Fields – Enter information not found on the standard form. Select from the list or create your own by clicking on the hand icon (top left side of the user defined field.
- Insurance Policies – If you need to track a vendor’s insurance policy, enter that information here.
- General Liability Policy Number – The vendor would provide this to you.
- Worker’s Compensation Policy Number – The vendor would provide this to you.
- This Vendor might supply materials for resale – Tick this box if applicable to the vendor. When ticked, this vendor will appear in the Item Alias form.
Pop-Up Notes
- Pop-up Notes form when creating Bills, PO’s, etc. – Ticking this checkbox causes the vendor’s notes to automatically appear when bills, purchase orders, and other similar forms for the vendor.
- Pop-up Notes form when opening this vendor – Ticking this checkbox causes the vendor’s notes to automatically appear when opening the vendor form.
- Pop-up Notes form when opening their contact log – Ticking this checkbox causes the vendor’s notes to automatically appear when opening their contact log.
Related Content


