

Introduction
The Company Information window stores general data such as business name and contact information, business structure, slogan, various tax numbers, start date, fiscal year information, and more. It is where to point Total Office Manager to your company logo so it can be used on invoices and elsewhere. Entering company data in this window is the first setup step to complete after installing Total Office Manager.
Form Access
-
From the main menu, click Company | Company Information.

Common Commands
Certain common commands are available regardless of the tab being viewed.
- Save & Close – Saves any entered data and exits the form.
- Cancel – Exits the form without saving.
- Menu | Save & Close – Saves any entered data and exits the form.
- Menu | Notes – Opens the notepad for the company. A virtually unlimited amount of notes can be entered here. See the related topic, “Notes” for details.
- Menu | Image – Opens the “Company Image” window, used to setup the official company logo for use on invoices and other reports. See the related topic, “Images” for more info.
- Menu | Contact Log – Opens the contact log for the company. See the related topic, “Contact Log” for more info.
- Menu | Document Links – Opens the document links feature specifically for company related documents (as opposed to customer document links, or vendor document links). See the related topic, “Document Manager” for more info.
General Tab

The general tab of the Company Information window is where to enter the business name, contact info, and other data as described below.
- Name – Legal name of your company. When printing, you will have the option of using this or the DBA in certain important documents like checks, invoices, POs, etc.
- DBA – Abbreviation for “Doing Business As.” Companies must usually file DBA with their state indicating their doing business under a particular business name. When printing, you will have the option of using this or the company name in certain important documents like checks, invoices, purchase orders, etc.
- Address 1 – Typically refers to your main location or building.
- Address 2 – Additional address information.
- City/State/Zip – City and State your company resides in or you do business in.
- County – County your company resides in or you do business in.
- Phone – Business/Company Telephone Number.
- Fax – Business/Company Fax Number.
- Country – Country your company resides in or you do business in.
- Email – Business/Company Email Address.
- URL – Enter the URL (web address) of the company website.
- Business Structure – Choose from Corporation, S-Corporation, Sole Proprietorship, Partnership, Limited Liability Corporation.
- NAICS or SIC – Enter the NAICS or SIC number for your industry. Both SIC and NAICS classify establishments by their primary type of activity. SIC has been replaced by the newer NAICS. NAICS was developed jointly by the U.S., Canada, and Mexico to provide new comparability in statistics about business activity across North America. For more information go to www.census.gov/epcd/www/naics.html.
- Business Description – The type of business or services you provide.
- Company Slogan – Enter a distinctive company motto or catch phrase which expresses the aims or nature of your organization.
Other Information Tab
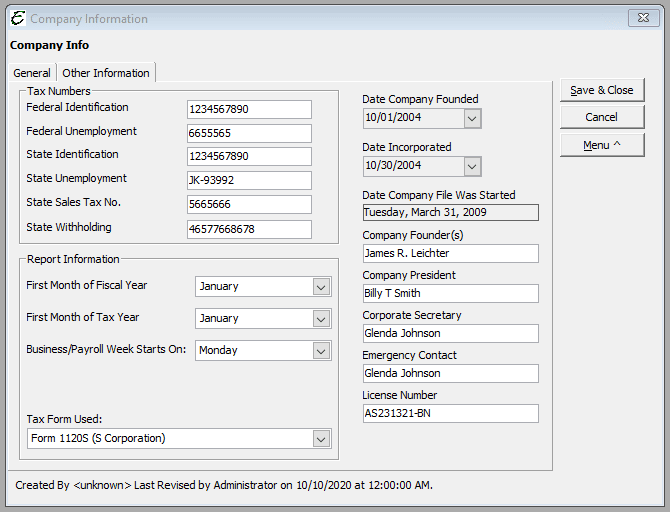
The Other Information tab of the Company Information window is where to enter tax numbers, report information, and related data as described below.
- Federal ID No – The number assigned to your company for paying Federal Taxes. An Employer Identification Number (EIN) is also known as a federal tax identification number, and is used to identify a business entity. Generally, businesses need an EIN.
- Federal Unemployment No – The number assigned to your company for paying Federal Unemployment Taxes. The employer must pay FUTA and file Form 940 (Fill-in PDF) or 940-EZ (Fill-in PDF), Employer’s Annual Federal Unemployment (FUTA) Tax Return. Only the employer pays this tax; it is not deducted from the employee’s wages. In certain cases, wages paid to students, and railroad & agricultural workers are exempt from FUTA tax.
- State ID No – Typically refers to your State Business License number. This will be in compliance with YOUR State’s Laws and Regulations. If applicable.
- State Unemployment No – Typically refers to your State Unemployment Tax number. This will be in compliance with YOUR State’s Laws and Regulations. If applicable.
- State Sales Tax No – Typically refers to your State Sales Tax number. State – Tax is imposed on all retail sales, leases and rentals of most goods, as well as taxable services. This will be in compliance with YOUR State’s Laws and Regulations, if applicable.
- State Withholding No – Typically refers to your State’s Withholding Taxes Number. This will be in compliance with YOUR State’s Laws and Regulations. If applicable.
- First Month of Fiscal Year – The first month that your business year starts on. Most companies start their business year January 1st. This is called a calender year. The IRS will not allow you to start on any day accept the first day of a month. Note: Businesses generally need special permission form the IRS to adopt a business year other than a calendar year.
- First Month of Tax Year – The first month that your tax year begins. For some businesses, this is not the same as their fiscal year, but this is VERY rare! Total Office Manager will use this information for tax related reports.
- Business Week Starts On – Select which day of the week starts your company’s work week.
- Tax Form Used – All companies are required to complete some type of tax return. This refers to the main form your company uses. Total Office Manager will use this information for tax related reports.
- Date Company Founded – Enter the actual date you founded your Company. Use the drop-down menu and enter the date from the calendar.
- Date Incorporated – Enter the actual date your Company was incorporated. Use the drop-down menu and enter the date from the calendar.
- Date Company File Was Started – Enter the actual date your Company started using Total Office Manager.
- Company Founder(s) – Enter the name of the person or persons who started the company.
- Emergency Contact – Enter the Name of the person that should be contacted in case of an emergency.
Tips
- Some of the information you enter into your Company Information will appear into other forms and reports, thus saving time and eliminating keying errors.
- Double check all the information you enter for accuracy. This will help avoid errors later on when doing; monthly reports, quarterly reports, and year-end reports, especially in your first year.
