
Scheduling Wizard Introduction
The Scheduling Wizard is found on the (new) Schedule Board. It gives the user the ability to create scheduled work orders and assign one or more technicians through a simple step-by-step process. Each step of the Scheduling Wizard is split into pages with buttons at the bottom of the page that will be disabled until all necessary data has been provided. Users can go to previous pages and change information if needed.
The system was designed to help users select the best technician for the job based on their skill set and estimated time of arrival to that call. The system uses Total Office Manager’s Skills Checking feature and combines it with our GPS tracking and mapping systems.
Requirements
This feature is included in the New Schedule Board. At the moment, this feature is being offered at no extra charge. It requires the optional Schedule Board Mapping system and GPS Device Tracking service. Please contact your account manager for more information about these services.
Step-by-Step Process
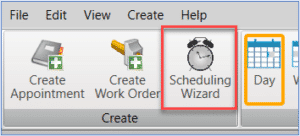
From the New Schedule Board, click the Scheduling Wizard button. The Scheduling Wizard will open on the right side of the schedule board.
There are two options. 1. Schedule Multiple Unscheduled Work Orders. 2. Create and Schedule a New Work Order. Each option is explained in detail below.
Create and Schedule a New Work Order
Use this option when you want to schedule a work order and assign it to a technician that can get to the work order address the quickest. The wizard will check the location of each technician against the location of the work order.
This process is almost identical to creating a work order using the method you are likely already used to.
- From the New Schedule Board, click the Scheduling Wizard button. You may also right click on an empty section of the schedule board. The Scheduling Wizard will open on the right side of the schedule board.
- Select the Create and Schedule a New Work Order option and click Next (bottom right).
- Select a customer or job from the drop-down list. You may search simply by typing in a few characters.
- Verify the customer’s information. Update this information as needed. Click the Next button.
- Tip: If the Next button is unavailable, that is because the Wizard cannot find the customer’s location. The address is likely invalid. Double check the address.
- Select a Work Order type. The Work Order Type that you select will be matched against the Work Order Types selected at Edit Employee > Skills stab. The Duration will be added automatically. You may edit that value.
- Enter a short reason for the call in the Brief Description field. This field is like the subject line of an email. Enter additional information in the Detailed Description field if needed. You may enter a Private Description that will only be seen by your company. The Technician’s Notes field is where the technician’s notes will eventually appear. You may use this space if needed. Keep in mind, you are sharing this space with the technician and these notes are what appear on the work order or invoice that the customer sees. Click Next.
- You will see an ASAP button and a Schedule Time button. Use the ASAP button for emergency calls that need to be handled immediately. If this call is to be scheduled in the future, click the Schedule Time button.
Schedule Time Button
-
- Click the Schedule Time button.
- Enter a Date and Time. Click the Find Technicians button.
ASAP Button
-
- Click the Find button.
- Click the Find Technicians button.
- Select one or more technicians.
- A list of technicians will be loaded into a list. The list will show all technician’s that are selected in the Selected Employees list (found in the Lists View area of the schedule board). The list will show technicians sorted by who can arrive the soonest and then by shortest drive time. You can then select which technician(s) for the work order(s) to be created. When at least one technician is selected the next button will become enabled, allowing that user to proceed to the next page.
- Select a Confirmation Status for the work order(s). This is the same Confirmation Status feature that you may already be using.
- Click the Finish button to create your work orders.
That is all there is to it. Now you can manage these work orders the same way you have always managed them.
Advanced Topic – Explaining the Scheduling Algorithm
If you are curious about the details behind how the Schedule Wizard works, this information is for you. Otherwise, you may feel free to skip over the rest of the article.
The main business logic involved in determining the drive time is finding the technician’s location. The customer’s location and the technician’s location are supplied to the Bing API and the route information is returned which contains the estimated drive time. The preferences for now are set to their defaults and cannot be changed yet. The ‘Use Asset GPS Threshold’ preference is set to 60 seconds. The ‘Default Source Location’ preference is set to technician’s home. Another thing to keep in mind is that currently the truck location and phone location are not implemented.
Determining the Technician’s Location
The flow-chart shows how finding the technician’s location is determined.

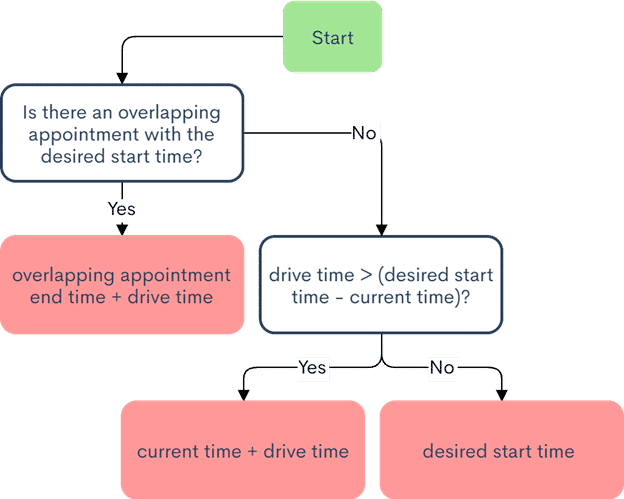
After Bing returns the data for the route, the estimated time of arrival is calculated. The estimated time of arrival will check if there are overlapping appointments with the desired time. If there are overlapping appointments, the overlapping appointment with the latest end time will be taken and the drive time will be added to that time to determine the estimated time of arrival. If not, desired start time will have the current time subtracted from it. The result of that will be compared against the drive time. If the drive time is greater, the estimated time of arrival will be the current time with the drive time added to it. If not, the estimated time of arrival will be simply the desired time.
Estimating the Time of Arrival
The flow-chart shows how the estimated time of arrival is determined.
Display of Geographic Data
While the Scheduling Wizard is being used, the map will display route information to the user. The first instance that will appear on the map is the customer location pin. This will show up when a customer is selected on the first page and they have a valid address. This pin will show the location of the target customer. The second instance will appear when technicians are selected. The starting location pin and the route line for that technician will appear on the map. If deselected, that route will then disappear. When all Scheduling Wizard panes are closed, the routing layer will be cleared on the map and all Scheduling Wizard related objects will be removed.

