
Introduction
User Defined Fields (UDF) allows for the creation of custom fields specific to your organization. For example, if you want to track customer birthdays, you can create a UDF to do just that. A user defined field can be set to display on only one or any combination of Customer:Job Forms, Employee Forms, Vendor Forms, Asset Forms, Service Agreement Forms, Equipment Forms, Sales/Invoice Forms, and Work Orders. UDF’s are searchable by using the Advanced Search tool.
Form Access
-
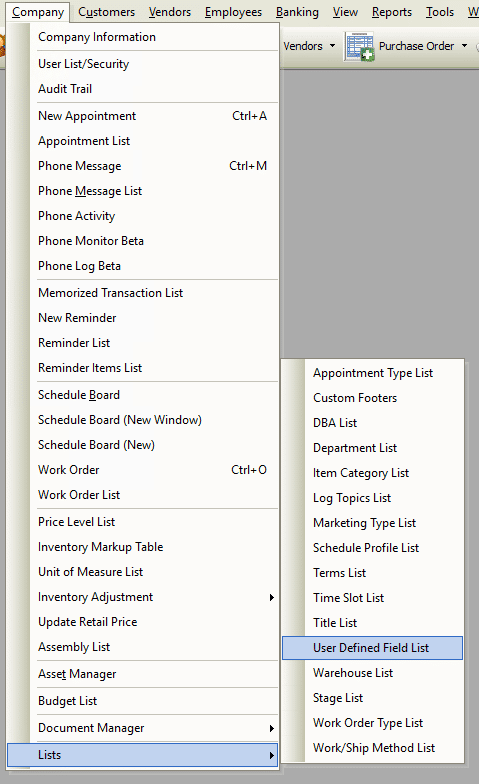
From the main menu, click Company | Lists | User Defined Fields List.
Usage
Perhaps the easiest way of using the commands available in this list is through its right-click menu.
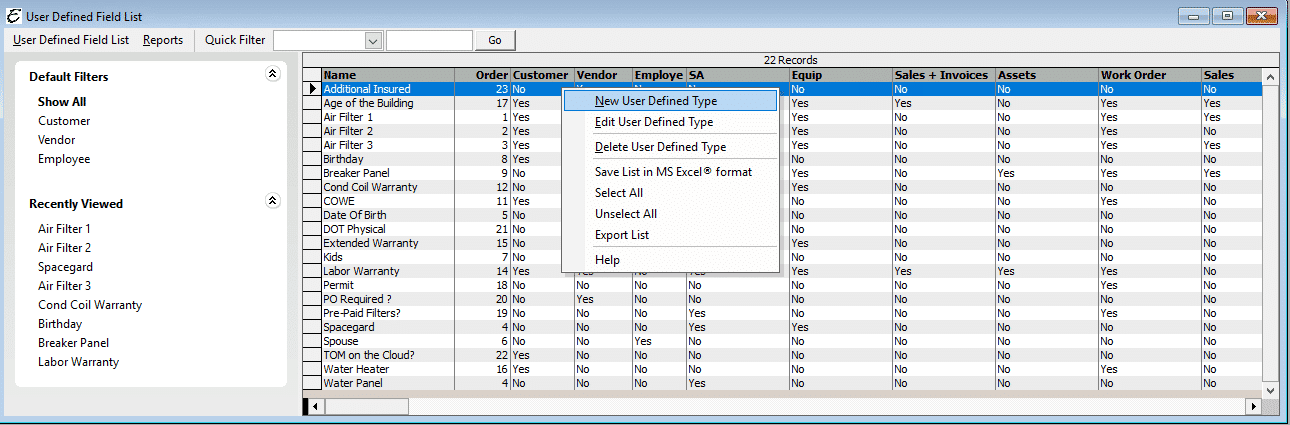
- To create new UDF, right click anywhere in the list and choose New User Defined Type from the pop-up menu.
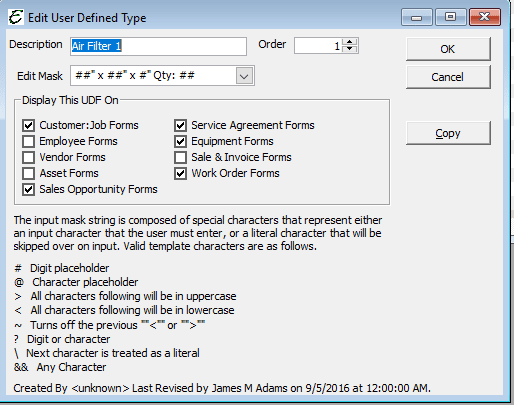
- To edit a UDF, right-click on it and choose Edit User Defined Type from the pop-up menu.
- To delete a UDF, right-click on it and choose Delete User Defined Type from the pop-up menu.
- Note: It may not always be possible to perform this action. inactivation may be more appropriate.
- To export whatever information is currently displayed in the list, right-click anywhere in the list and choose Export List from the pop-up menu.
Creating a New Customer Type
Right click anywhere in the User Defined Field List and choose New User Defined Type from the pop-up menu. The “Add User Defined Type” form will appear.
User Defined Fields are also capable of being “masked”. Masking is simply a means to ensure data is entered in a uniform format in UDF’s. For example, masking can be used to ensure phone numbers are entered in the format (800) 555-1212 instead of 800-555-1212 or any other format.
The Add User Defined Type Form
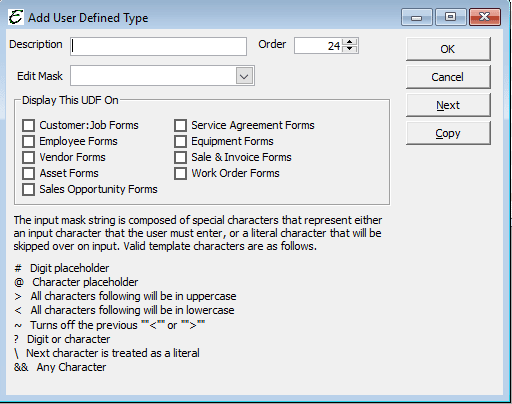
- Enter a name for the UDF in the “Description” field.
- If required, create a new mask or select and existing mask using the “Edit Mask” field.
- Tick the checkboxes for each form on which the new UDF should appear.
- Adjust the sequence in which the UDF will appear by using the “Order” field.
- Click the OK button to finish and close the form, or click the Next button to save and go on to create another. The Copy button is used to create a new UDF based upon an existing UDF.
Example
Important Note
When you edit a UDF on one form (such as a customer), UDFs on other forms are not effected.
Example: You have “Air Filter 1” on the Customer:Job form and “Air Filter 1” on the Work Order form.
These are separate fields and are not related.
Changing the value on one form will not change the value on another form.
Tips
- When you create a work order from a Customer:Job, UDF’s that share the exact same name will be populated with the contents of the Customer:Job UDF.
- Remember: If you update the UDF on one form, they will not update on any other form.
- The Marketing List Generator allows you to include up to fifty (50) UDFs in your search results.
- These are numerous Custom Data Views (CDVs) that allow you to include UDFs.

