

Using the Customer:Job List
The Customer:Job List is used to manage all customers and jobs. It is the central information center for customers within Total Office Manager. Within the Customer:Job List, users have the ability to sort by active and inactive individuals and create filters or Smart lists to customize the window.
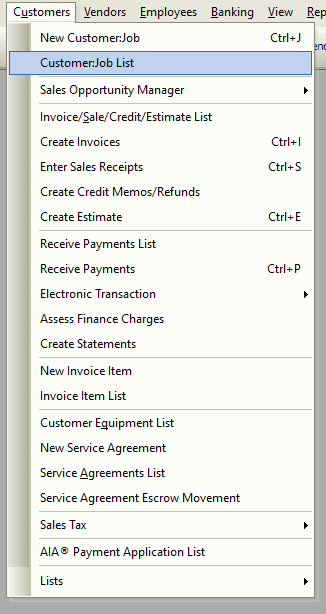
Accessing the Customer:Job List
-
From the main menu, click Customers | Customer:Job List, or
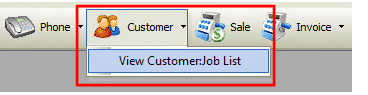
- From the toolbar, click the drop-down arrow to the right of the new customer button and choose View Customer:Job List.
Usage
Perhaps the easiest way of using the commands available in this list is through its right click menu.
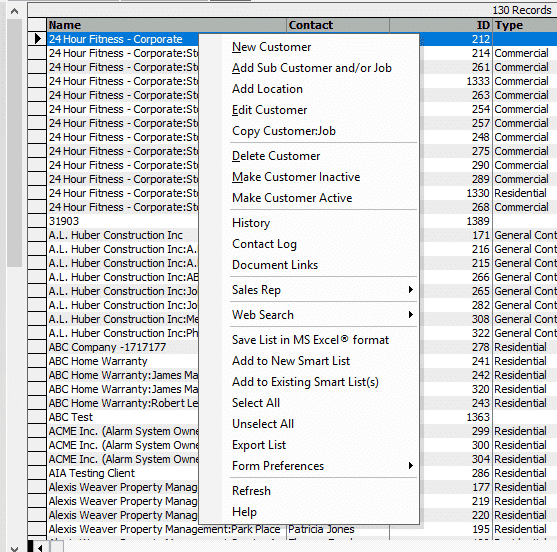
- To create new customer or job, right click anywhere in the list and choose New Customer from the pop-up menu.
- To create sub customer (child account) or job, right click on an existing parent account and choose Add Sub Customer and/or Job from the pop-up menu.
- To edit a customer, right-click on it and choose Edit Customer from the pop-up menu.
- To delete a customer, right-click on it and choose Delete Customer from the pop-up menu. Note: It may not always be possible to delete a customer, due to the amount and type of historical transaction which may have taken place. Inactivating a customer is generally preferred instead of deleting.
- To inactivate a customer, right-click on it and choose Make Customer Inactive from the pop-up menu.
- To activate a customer, right-click on it and choose Make Customer Active from the pop-up menu.
- To open a customer’s history, right-click on it and choose History from the pop-up menu. The customer history will open and display the entire historical record of transactions for the customer and more. This is an extremely powerful area of the program, able to provide quick answers to questions without having to generate and wade through reports and such.
- To open the contact log for a customer:job, right-click on it and choose Contact Log from the pop-up menu.
- To export whatever information is currently displayed in the list, right-click anywhere in the list and choose Export List from the pop-up menu.
- To modify which columns are displayed in the list, right-click anywhere in the list and choose Form Preferences | Show Columns from the pop-up menu.
- To set which field the “find as you type” feature has focus, right-click anywhere in the list and choose Form Preferences | Find As You Type from the pop-up menu.
Tips
- You can inactivate multiple customers at one time. To highlight multiple customers, press and hold your CTRL key and click each customer’s box on the left side. To select a range of customers, highlight the first customer in that range, press and hold your left Shift Key, and click the last customer in that range.
- Once selected, right-click and click Make Customer Inactive.
- The customer’s phone number will be associated with the Phone Monitor System (Company | Phone Monitor). You have the ability to instantly go to their file. A Log is available, click on the Log tab and you will see, at a glance, the history of the customer, and a record all the correspondence you have with this customer.
- Example: Customer’s complaints or how customer service satisfaction may have been handled.
- To update the Customer:Job Type for many records at once, isolate through the various filtering and sorting means available all of the records requiring an update, then highlight all of the records to update. From the Actions menu, click Batch Update Cust:Job Types. The “Batch Change Customer Type” form will appear. Select the new Customer Type and click “Update”.
Note (Optional Software): If you have Phone Monitor installed and turned on, when a call comes in, it will display on your screen. Click on the View button (far left hand side of form) this will pull up the customer or employee’s file (if they are in your database) of the incoming call. Click on the Log tab and log in the conversation as it is taking place.
Q&A
Q: Can I batch update fields for customer records?
A: You are able to batch update many fields with the exception of the customer names using the Update Customers import utility. You may review a list of these fields in the KB Article for Importing. To prepare and import your file, complete the following steps:
- Open the Customer:Job List. Filter for the records you wish to update.
- Right click on the list and choose the option Form Preferences | Show Columns. Ensure the ID and any other column you wish to update are checked. Click OK.
- Right click on the list to export/save to MS Excel.
- Open the file and make the modifications needed. It is advised to only keep the ID column and any columns you are updating. Save the file.
- In Total Office Manager, navigate to File | Company Utilities | Import.
- Select the file you just saved.
- On the Import Wizard, select Update Customers and click >>Next.
- If not checked, check the box that indicates your column headers are in the first row.
- Field headings should be mapped for those fields that are available to import. Click >>Next.
- Check the box next to Clip Strings to Length.
- Check the box that says Overwrite Existing Data. Click >>Next.
- Check the box acknowledging importing of your data. Click >>Next
- Click the Import button.
- Once the import has completed, click Finish.
