
Create Financial Divisions and Departments to Track Profitability
This topic will cover setting up, editing, deleting, and inactivating divisions and departments. This topic also covers the use of the department list form and how to select departments on various forms. The Merge Departments Utility is also covered. Please be sure to read the Tips sections for helpful information.
Why Create and Add Departments?
The Department feature is very important to understand and use. It will be used to organize income, COGS, and allocate overhead by each division and that division’s department. This feature allows your company to produce fully departmentalized income statements, down to net profit. Imagine handing each of your department managers an income statement that shows them their department’s true net profit. Now that’s accountability!
Financial versus Organizational Departments
This feature is used to track departments which are also profit centers (that perform revenue generating activities). Please don’t confuse this with the various organizational departments within your company. For example, someone might work in the Human Resources (HR) department, but you typically would not create an HR department in this list.
Terminology Used
There are no “official” terms to describe this subject. The terms “Division” and “Department” are not official terms, but they seem to be the most commonly used.
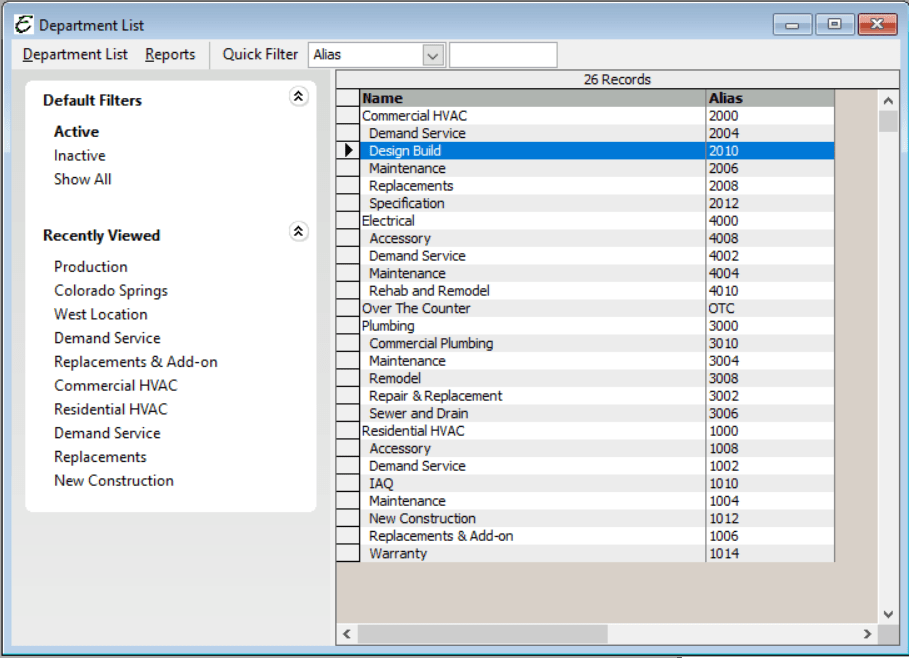
Division: Used to describe the Trade, such as Electrical, Plumbing, HVAC, etc. This could also be used to describe a business location.
Department: Used to describe the service offered within that Trade. Profit Center is another term often used to describe a department.
Using the Departments Form
Use this form to create a department (AKA: Profit Centers) for your business. Examples may include Service, Installation, and Maintenance. You will find department selection lists throughout the software. Invoices, Estimates, Credit Card Charges, Bills, Item Receipts and other forms allow you to select a “main” department and additional departments on each row. The main department selection is usually found near the top of the form. For the main department, select the department that the transaction most applies to. If needed, select a department for each row on that form. It is very important that users select departments whenever possible.
Departments can be displayed on your income statement, transaction detail by account, and certain other reports. This allows you to better understand how your particular departments contribute to your company’s overall profit or loss. Departments are an essential part of our Contractor Compass™ dashboard system.
Department List Form Access
- From the main menu, click Company | Lists | Department List.
Creating a New Department or Division
Create a new department as follows:
- Right-click anywhere in the Department List and choose New Department from the pop-up menu. The Add Department form will appear.
- Enter a title for the department in the “Department Name” field.
- Enter an alpha-numeric abbreviation for the department in the “Alias” field (3 characters max). This field is required and may not be duplicated. Example: SRV for Service.
- If the department is a “sub” or “child” of another existing department, choose the “parent” account from the “Subtype of” field. For example, you may create a parent department called Service and two children called HVAC and Plumbing.
- If necessary, enter general notes about the department in the “Description” field.
- Click OK to save and close the form. Click the Cancel button to abort the action or Next to save and add another.
Department Form Field Definitions
| Department: | Enter a description of the department. We recommend you keep it short. Example: Service or Installation. |
| Sub Type Of: | Select another account as a parent. For example, you may create a parent department called HVAC and Plumbing and two children called Demand Service and Maintenance. |
| Description: | Enter a full description of the department. Example: General repair and maintenance of HVAC equipment. |
| Alias: | Enter a four-character alias for this department. This field is required and may not be duplicated. Example: RSRV for Residential Service. You could also use numbers. Some reports use the alias as a header name. |
| Department is Inactive: | Check this box to inactivate the department. When inactive, the department is not deleted, it is only removed from selection lists. |
| OK: | Saves your changes and closes the form. |
| Cancel: | Closes the form without saving any changes that were not already saved. |
| Advanced: | This button opens the “What Best Describes” feature. See below for more information. |
Advanced Button
What Best Describes Selections
This selection is used in Contractor Compass. You do not need to make selections here unless you will be using that product. If the list does not include an applicable option, you do not need to make a selection. It will not matter.
Example of Division and Department Setup
This is EGIA’s and Aptora’s recommended divisions and departments list set up for the related companies shown.
Multiple Business Locations
If your company has more than one business location, you might consider the location to be the top level. Divisions and Departments may then fall beneath the locations. Here is an example:
Location
Trade
Department
Or
Tampa Bay
HVAC
Demand Service
Merge Departments Utility
You can merge two departments together. This process moves the data from one department into another. The process works the same way you might have merged two accounts in your Chart of Accounts (COA) list. Here is how to merge two departments.
- Open the Merge Departments Utility. This option is under the Department Lists menu.
- Select the source (where the data is moved from) and select the Target (where the data will be moved to).
- After the merge is complete, you can inactive or delete the source department. That’s an option.
Tips Related to Divisions and Departments
- Parent Department/Divisions (top level) should not be selected when entering transactions. In other words, you should not select a parent when entering a bill or invoice. Example: Let’s say you have a department or division called “Commercial” with a sub (aka: Children) under it called HVAC. You should never select Commercial. You should select the lowest tier/level.
- When creating an invoice, select the department in the header area. This selection represents what department this invoice belongs to.
- Example: Let’s say that we have an invoice for preventative maintenance work, which performed as part of a service agreement the customer owns. Let’s say that we call this department “Service Agreements”. Service Agreements should be your department header selection. If you have a line item for the tune-up that is part of the service agreement, select that department for that line item (same as what you selected in the header). If the technician sells an accessory or indoor air quality (IAQ) item, select the IAQ department on the row(s) that contains that item. Doing this allows you to see situations where the technician “upsold” or sold extras.
- You can add as many locations, divisions, and departments as you like.
- Please be sure to read about the Department Overhead Allocation feature. That feature is very much related to this topic.
How to Use the Department Feature
The following is the key to having departmentalized financials.
Select a Department Whenever Possible
All transactions such as invoices, bills, credit card charges, item receipts, adjusting journal entries, earning items, and many others, have a department selection. When you are dealing with money, it is important to select a department. To put it simply, you just select departments whenever you have the opportunity.
Multiple Departments on One Form
Some forms have multiple department selection lists. For example, when entering an invoice, there is a department in the header (upper left part of the form). There are additional department selectors in the item grid. This is true with bills, items receipts and many other forms. Be sure to select a department in the header. When you add rows to the grid, the department in the header will be added automatically to each record in the grid. You can change the department if needed. Why would you? There may be times where the form mainly relates to one department by certain items belong with another department. Example: You have an invoice for “Demand Service” and the technician sold “Indoor Air Quality”. You may wish for the IAQ line item to be counted towards the Indoor Air Quality department.
Updating Non-Departmentalized Transactions
You may find yourself wishing you had been doing this earlier. You may go back and edit historical records. There are utilities that allow you to add departments to certain transactions in bulk. Total Office Manager includes a Customer Data View report that allows you to list transactions that do not have a department selected. We have provided links to the related help topics below.
Related Help Topics

