
How to Setup and Use Flat Rate Simple™
A Simple Flat Rate Pricing Management System Built with Microsoft Excel®
A Great Idea for Simple Flat Rate Pricing – Introducing Flat Rate Simple™
Flat Rate Simple™ (FRS) is a flat rate price book management system built with Microsoft Excel®. It was designed and built to be the absolute easiest system to use while still proving a great balance of functionality and features. This easy-to-use flat rate system was designed to be successfully implemented in your company with the least amount of effort possible. There are about 3300 professionally constructed tasks that cover HVAC, commercial refrigeration, electrical service, plumbing repair, and drain cleaning. Residential and light commercial work are covered. FRS covers maintenance, repairs, and equipment replacement tasks. You can print smart looking flat rate books and export the data for easy integration into nearly any software program. And because FRS was built in Excel®, it is essentially 100% customizable.
Product Training on YouTube®
Please click this link to view a seventeen-minute training video on how to use Flat Rate Simple. Flat Rate Simple (youtube.com)
Flat Rate Simple® Retail Product Information
You will find more information about this exciting flat rate product here.
FAQs about Flat Rate Simple
Let’s start with the most asked questions we receive and get those out of the way.
Q: What is the main purpose of the software and what type of customer is it geared towards?
A: We built the FRS system for companies that have a software management program that they want to import flat rate tasks into. This system was intended for companies that do not want their tasks to be made up of inventory parts inside group items.
Q: What version of Microsoft Excel® do I need to use Flat Rate Simple?
A: Microsoft Excel 365. Older versions will not work because we are using the latest features, only found in Excel 365.
Q: Can we use Google Sheets with Flat Rate Simple?
A: No. Sorry. We only built this for Excel 365.
Q: Do you include HVAC equipment and how did you come up with the prices for that equipment?
A: We have included a variety of equipment, but the equipment is not priced. There is no practical way to include pricing that is accurate enough. You need to enter your own pricing. You may need to modify the descriptions too.
Q: How often does Aptora update the prices of parts and tasks and how do we get the updates?
A: We update the prices on a regular basis, but we do not offer updates. You maintain the pricing of your tasks. We keep the product updated but once you buy it, the product is no longer updated by us.
Q: Does Flat Rate Simple include a list of task items (items used to create tasks)?
A: Flat rate repair and installation tasks are built without adding specific items. We are using the “Service Item” concept. Service Item types are used in QuickBooks Desktop®, QuickBooks Online®, Total Office Manager®, NetSuite®, and other popular software programs. This approach to flat rate pricing makes managing the flat rate system super simple.
Q: How can we update the prices, add tasks, or make changes to the flat rate pricing?
A: It is very easy. You are working in Microsoft Excel®. You can change your labor rates and item markups at any time. You can quickly enter new pricing as needed.
Q: Can we design our own reports?
A: We include a Manager’s Report and a Technician’s Report. You can redesign these if you are well above average using Excel. The reports are formatted and controlled using a function built with Lambda. We will explain this in more detail later in this article. We cannot help you with this type of work.
Q: What software programs does Flat Rate Simple synchronize with?
A: We do not synchronize with any software program. Excel 365 can be made to do this. We offer a one click file export that allows you to quickly import your flat rate tasks into nearly any software system.
Q: Which software programs can import the flat rate tasks from Flat Rate Simple?
A: Any program that allows you to import flat rate tasks or non-inventory items. In QuickBooks, you important Service items. Almost any accounting or invoicing program can do this.
Q: Is there a user manual for Flat Rate Simple?
A: The program is so easy to use, we did not see a need for a manual. This article should be more than adequate. There are a lot of tips and notes to be found in the various program screens.
We will send you our free book called “The Business of Flat Rate Pricing” with the purchase of Flat Rate Simple.
Inventory Management Book: We have written a great book on inventory management called “The Essential Guide to Inventory and Warehouse Management with Total Office Manager”.
Q: Where can we buy Flat Rate Simple?
A: You can purchase Flat Rate Simple right now by going here.
Q: Do you offer a more powerful flat rate system that goes beyond Flat Rate Simple?
A: Yes, we do. We are the makers of Flat Rate Plus® and we have been selling it since 1996. Flat Rate Plus may be the best-selling flat rate pricing software of all time. To be fair, it is hard to say for sure. We now sell an online version of that program, and it is called Flat Rate Plus Online®. FRPO includes a large database of around 15,000 parts with around 5000 tasks. The tasks in FRPO are comprised of labor items, inventory parts, materials, and supplies. The system is web based and does use Excel. It includes an impressive set of tools and features. FRPO includes a task selection wizard, sales presentation system, invoicing, credit card processing, emailing, and more. Please go to the Flat Rate Plus Online home page to learn more. https://flatratesoftware.com/
Installing Flat Rate Simple®
You do not need to. You only need to open the file in Excel. You may get a warning, or an error related to running macros.
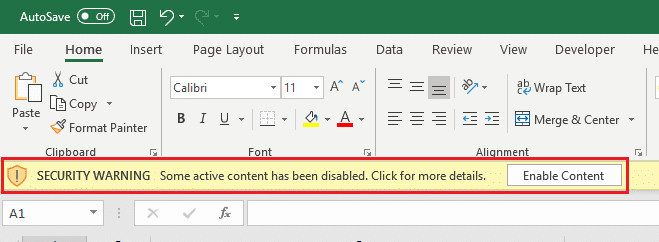
You Must Enable Macros
Macro Security:
Make sure your Excel settings allow macros to be run. You can adjust these settings in the Trust Center.
Saving and Sharing: If you’re planning to share this workbook with your co-workers, remember that they’ll need to enable macros for this functionality to work.
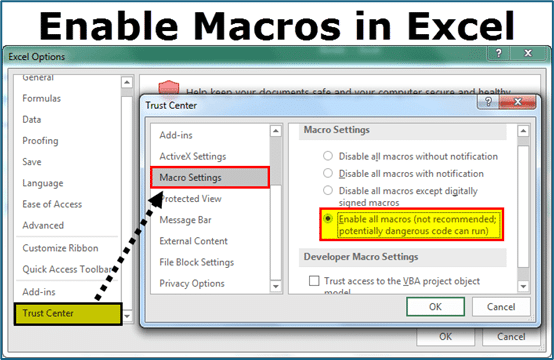
- Click on the File Tab of excel and go to the excel options.
- From the options, go to the Trust Center settings > Trust Center settings.
- In Macro Settings, select Enable all macros.
Explaining the Worksheets (tabs)
When you open the Flat Rate Simple Excel file, you will notice a set of tabs along the bottom of the Excel interface. Excel calls these worksheets. In this help article, we will refer to them as tabs. The following is a quick explanation of what each tab contains. We will discuss these tabs in more detail later in this article.
Instructions
You will find general instructions on how to use Flat Rate Simple™ and how to navigate the Excel workbook. You might think of this as a “cheat-sheet”. There is also contact information for Aptora Corporation and a hyperlink to this help topic. You will also find the password used to protect the workbook.

Setup
This is where you enter information needed to complete your flat rate books. Each input field is straight forward and there are popup tips and notes throughout.
This worksheet also contains information about your flat rate system such as the total number of tasks, inactive tasks, tasks that do not meet profitability standards, and more.
Tasks
This is where your flat rate tasks are located. You might spend most of your time on this worksheet. You can add, edit, and delete tasks here. There is an option to mark tasks as “Inactive”. That hides the tasks you’re your book, but you will still have that task in case you decide you want it. Changes you make here are reflected in the book you print and export.
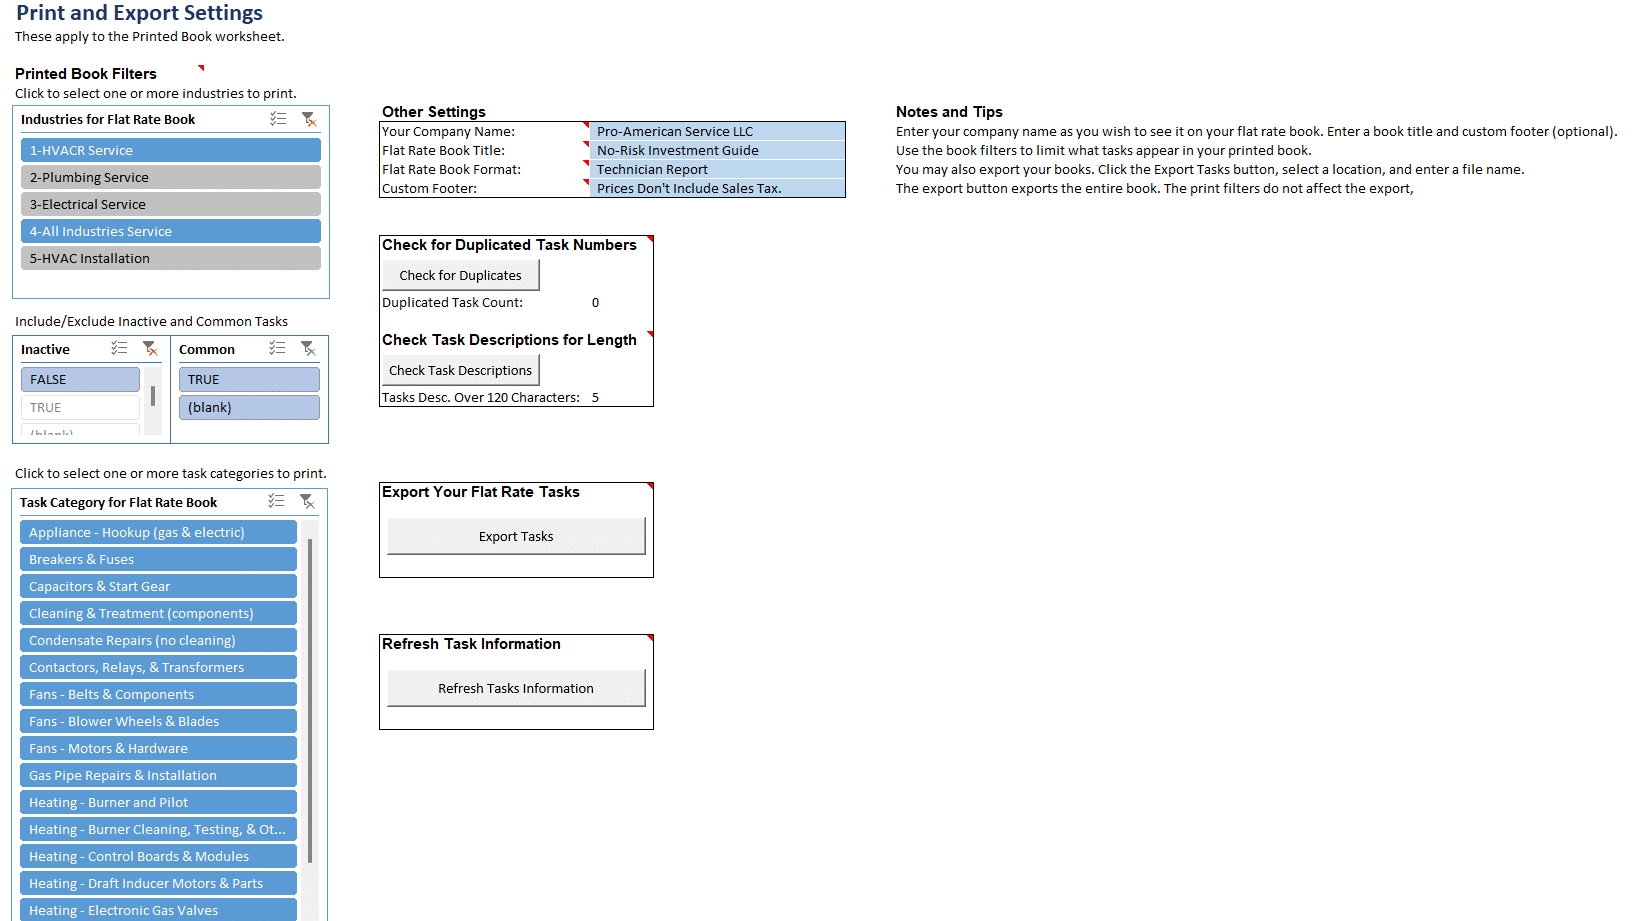
Print-Export Settings
This area allows you to select what industries you want as well as which categories you need. There are tools and utilities that perform handy functions such as scanning for duplicate tasks, checking for task descriptions that might be too long, and more.
This is where you will find the export button. The print filters do not apply to the export button. You may want to open the export list in Excel and delete the tasks that you do not wish to import.
Printed Book
The tab shows the user what the flat rate book looks like. The tasks included will depend on the settings from the “Print-Export Settings“ tab. There is a Print Preview button to preview what the printed copy will look like. From there, you may use the Print button to send the books to your selected printer.
Lists
This is where the various dropdown lists get their information from. When you click to select an Industry or a Task Category, the options in the dropdown menu come from the lists in this tab.
Stock List
We have included a handy inventory stocking list to help you list parts, materials, and suppliers you may with to keep in your main warehouse and on your trucks. You might consider this a free template for you to customize. This information is not part of the flat rate system and is not used in your flat rate books.
Tool Lists
We have included an example list of tools for service and installation work. As with the Stock Lists, you might consider this a free template for you to customize. This information is not part of the flat rate system and is not used in your flat rate books.
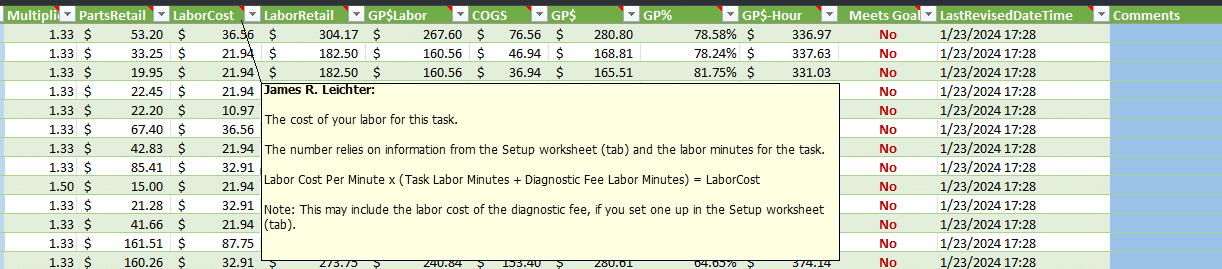
Information About the Columns
When you see a red corner in a cell, hover over it for details on what that column or field is all about.
Entering Basic Setup Information
The following information related to the “Setup” tab.
Enter Labor Rates
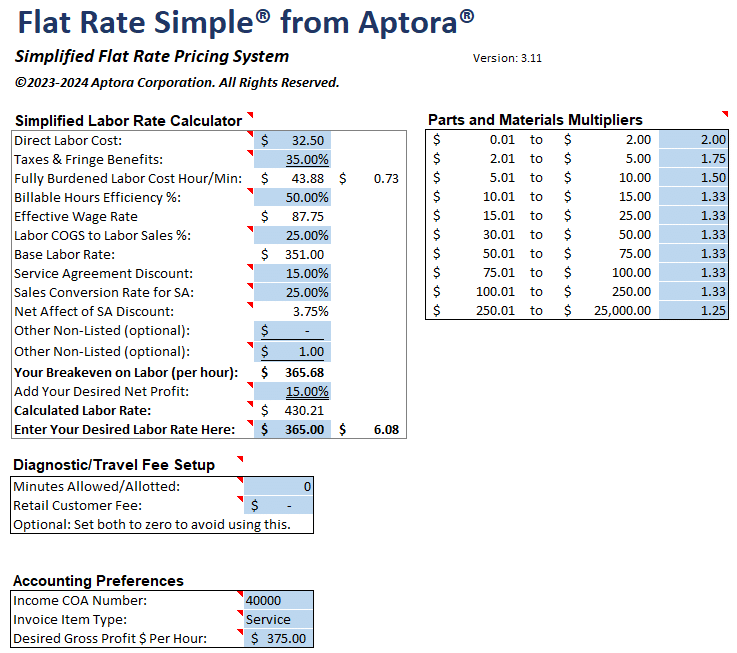
Your first step is to enter your hourly labor rate. Go to Setup > Simplified Labor Rate Calculator.
Each cell includes an explanation of what it is and what to do. Just hover over any cell that contains the red corner icon and is shown below.
Enter a Diagnostic Fee
This step is optional. Use this feature to add a diagnostic fee to the total retail price of the task. The system will consider the direct cost and added revenue in all calculations.
Note: We generally do not recommend using this feature. We prefer to add a separate item to the work order or invoice for the diagnostic fee. This approach offers more flexibility.
Set Parts Multipliers
You can accept the defaults, which are shown below. You may change them as needed.
Important Point on Parts Markup
These multipliers may seem low to you. Remember that your labor is paying for all the overhead and producing all the net profit. That’s why your parts markup is so low. Parts are marked up high enough to cover military, senior, or service agreement discounts plus enough to cover slight differences in the direct cost (the price you pay). With flat rate pricing, most of your profit comes from labor. Parts markup is minor. With Time and Materials, you need to get most of your profit on parts. The hourly fee must make up for the “loss leader” diagnostic fee.
Gross Profit Dollars Per Labor Hour
Enter your desired gross profit dollars per hour. This is the average desired amount across all tasks. The Tasks sheet will include the word “No” (in red) in the column called “Meets Goal?”. You may filter for these and examine them. Otherwise, this number does not affect anything else.
Recommendation: I generally suggest $350 gross profit dollars for each hour of billable time, before entering a diagnostic fee. Your overall goal is to produce $650 to $750 gross profit dollars for each person-day.
Important Notes
Remember, this number does not count the diagnostic process or any unbillable time.
It does take into consideration discounts offered for service agreement ownership (that is covered in your hourly rate calculation). It does NOT consider any promotions discounts, senior citizen discounts, military discounts, etc. In other words, $450 may seem like a lot, but it is not.
Please talk to a trusted expert if you have any questions or concerns about this or any part of this flat rate pricing system.
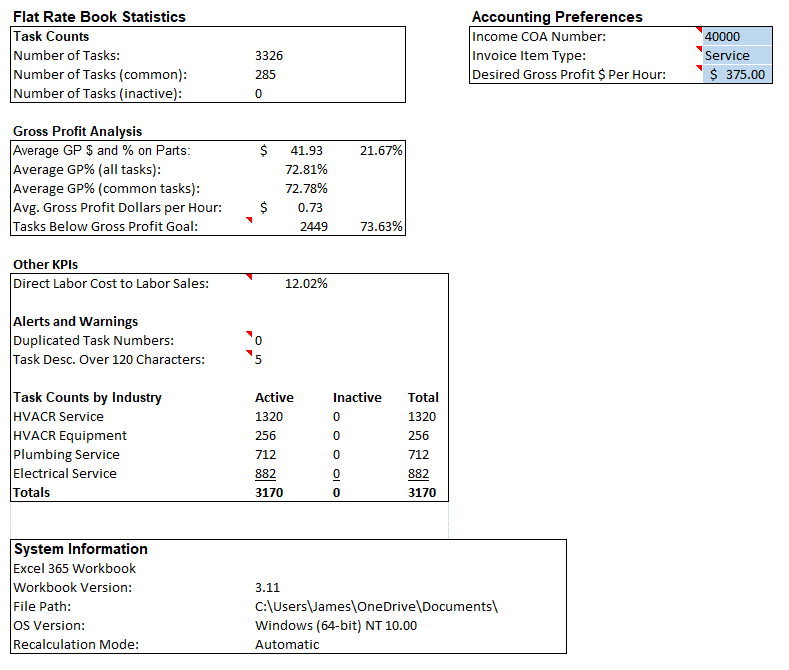
Flat Rate Price Book Statistics
The Setup tab includes helpful information about your flat rate tasks. Here you will see how many tasks are available, how many are inactive, how many tasks do not meet certain criteria, etc.
Customizing Your Flat Rate Tasks
The following information applies to the “Tasks” tab. Any cell with a blue background can be safely edited. All others should not be directly edited.
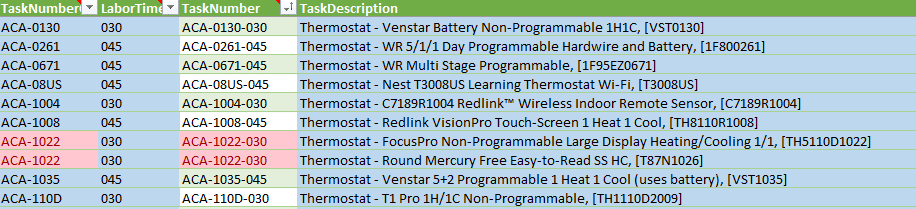
Task Numbers and Descriptions
- The TaskNumber column is not editable. It is the result of adding TaskNumberCore to LaborTime and those fields are editable.
- We have used three letters to begin each task number. Those letters help indicate the Task Category, but they are not tied together. You do not have to follow that pattern.
- We use three numbers for labor time. Example: 15 minutes is “015”.
- Duplicate Task Numbers are not a good idea. If duplicates are found, the software will highlight them in red, as shown.
- You can enter any description you like. If you use QuickBooks®, they allow 4000 characters.
Changing Industry and Task Categories
Industry List:
This is the industry the task may be associated with. To change it, click on the cell and select the dropdown menu. Industries can be part of (or used with) different Task Categories. The “Industry” list is populated from the Lists worksheet (tab). You can edit that list if needed. Make backups of your Excel file first. Do not enter information directly into this cell.
Task Category List: The Task Category list is populated from the Lists worksheet (tab). Task Categories can be part of (or used with) different Industries. You can edit that list if needed. Make backups first. Do not enter information directly into this cell.

Changing the Retail Price of the Task
The retail price of the task is comprised of the total labor amount (LaborRetail) and the total retail price of the parts (PartsRetail). You don’t directly enter a new retail price. You change the retail price by changing the price of the parts and the price of the labor.
Changing the Price of Labor
This is done in the Setup tab using the Simplified Labor Rate Calculator. You can also change the number of minutes assigned to the task.
Changing the Price of Parts
Update Task Item Prices:
In the Tasks tab, in the PartsCost column, update the direct cost of items used by the task. Only update Active tasks.
No Markup: This feature basically cancels the function of the Markup Table. Set this value to “TRUE” if for some reason you do not want to use the markup table to mark up the direct cost of the item. When might someone use this feature? You may not want to markup certain items that will create complaints about your prices, such as air filters, common thermostats, and more. This feature is also used when you want a fixed price. For example, we use the feature to set a fixed price on diagnostic fees.
Other Fields
Inactivate a Task:
If you do not need the task, you can set this value to “TRUE” or you can delete it. To delete it, delete the row. When importing into Total Office Manager from Aptora or QuickBooks from Intuit, the Inactive box on that item will be checked.
Common: This is optional. When set to “TRUE”. It can be used in Total Office Manager to set the “This is a commonly used item” feature, found under the item’s accounting tab.
It is okay to leave either of these blank (empty). That will be the same as FALSE.
Comments: This is optional. Enter any information you want here. This comment can be imported into the Item’s “Details” form. You find it helpful to explain certain things to a technician. The most common use is to enter important flat rate task information that a tech.
Removing or Hiding Tasks You Do Not Want
Go to the Print-Export Settings tab.
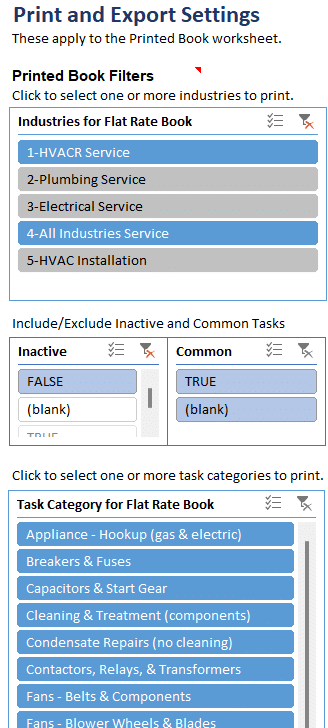
Filtering
- Select the Industries you want to work with. When you select an Industry, the Task Category list updates to show only the categories within the industries you selected. They are all selected by default.
- Deselect any Task Categories that you do not want.
- Select whether you want to include only Active Tasks, leaving out any that might be Inactive.
- You may have marked some tasks as “Common” The Common selection allows you to filter out tasks that are not marked as common.
Deleting
When you are 100% certain you do not want a task, you can delete the entire row. This is done the same way you would delete any record in Excel.
- You will need the password found in the Instructions tab.
- Go to the Review ribbon and click Unprotect Sheet and enter that password.
- Go to the View ribbon and check the Show Headers box. You will now be able to select an entire row and delete that row.
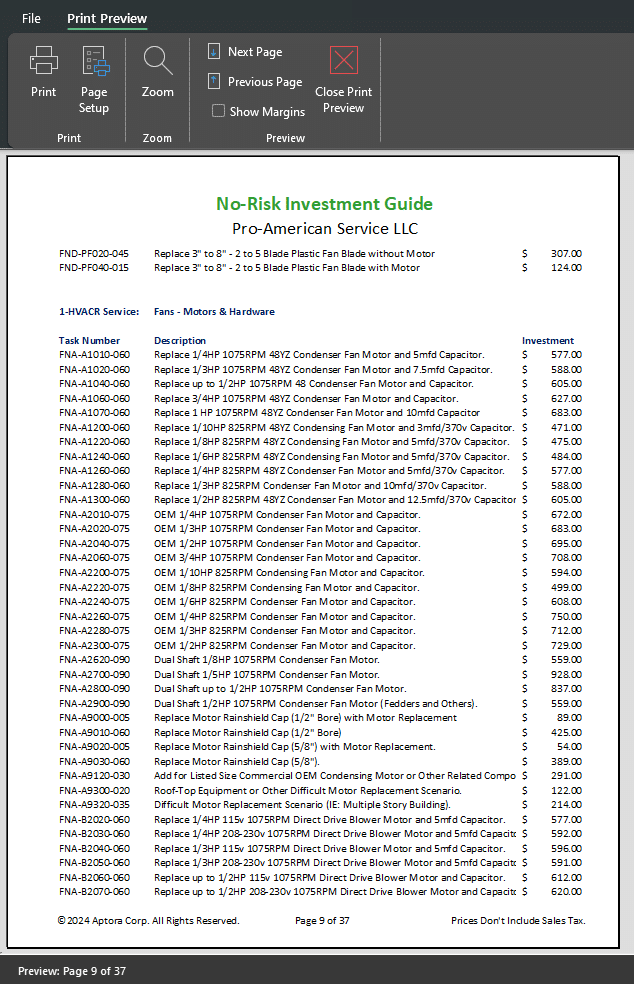
Printing or Previewing Your Flat Rate Book
The following information applies to the “Printed Book” tab, shown below. This is where you can preview your books and or print them. Be sure to read about the Print-Export settings to narrow your flat rate book down to the most common repairs.
Exporting Your Flat Rate Book
The following information applies to the “Print-Export Settings” tab, shown below.
- Be sure that your books are all set up, and the flat tasks look the way you want.
- Go to Setup > Accounting Preferences.
- Check the “Invoice Item Type” field should be “Service”.
- In the “Income Account Number” field, enter the Chart of Account (COA) number you wish to use for recognizing income.
- Go to Print-Export Settings and click the Export Tasks button. You will be asked to enter a name for the file and to select a location. You might place it on the Desktop for simplicity.
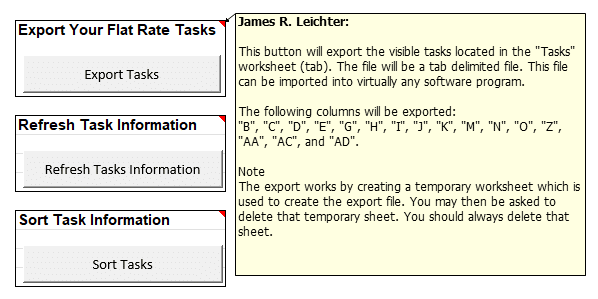
The Export Files
The export process creates two files. They are common text files known as a “Comma Separated File”. This format is the most universally accepted format available.
The first file contains your flat rate task categories. The second file contains your flat rate tasks.
The information is organized into a series of columns and rows separated by commas. Each field is enclosed within quotes. There is a header at the top of each file. Here is an example of what the task file looks like when viewed from Notepad.
“UniqueID”,”ItemType”,”COA”,”LaborTime”,”TaskNumber”,”TaskDescription”,”RetailPrice”,”Rounded”,”Industry”,”TaskCategory”,”Industry-TaskCategory”,”Inactive”,”Common”,”COGS”,”LastRevisedDate”,”Comments”
“510141”,”Service”,”40000″,”050″,”AHU-00280-050″,” Connect Gas Clothes Dryer. Includes Flex Connector and Vent Hose “,”407.37″,”407″,”1-HVACR Service”,”Appliance – Hookup (gas & electric)”,”1-HVACR Service:Appliance – Hookup (gas & electric)”,”False”,”False”,”76.46″,”04/04/2024″,”Task comments can go here.”
Explaining the Export Fields
This is a list of the fields (columns) included in the second file (tasks). You may not need or want all these fields. The names used are the same as the names of the columns they came from.
| Field Name | Explanation | Required? | QB Field Name |
| UniqueID | This is a number unique to this item and never duplicated. It is used to identify the task even if the TaskNumber value has been changed. This is used by Aptora for maintenance. | N/A | Not Used by QB |
| ItemType | This is used to identify the Invoice Item Type in QuickBooks. This value gets copied from the Setup tab. We recommend a Service invoice item type only. | Yes | Type |
| COA | This is the Chart of Account number used to track income from the sale of this task. This number gets copied from the Setup tab. Only enter the account number. Do not use the name. | Yes | Income Account |
| LaborTime | Task Time (labor minutes) for this task. You may up to four numbers. Do not enter letters. Example: 0060 = sixty minutes or one hour. | No | |
| TaskNumber | This is your task number. It is the number used to reference this task and it is what appears in your flat rate book. In QB, this is the Name field. | Yes | Name |
| TaskDescription | This is the description of the task. QB has a limit of 4000 characters. | No | Sales Description |
| RetailPrice | The retail price of the task, less sales tax (if any). | No | Use either this or Rounded but not both. |
| Rounded | This value comes from the RetailPrice column. It is automatically rounded to the nearest whole dollar. When importing this task, you can select the RetailPrice or the Rounded value to serve as your retail price of the item. Note: Sales tax (if any) will likely create a total that has cents. That cannot be stopped. | No | |
| Industry | The industry that the task is related to. This comes from the Tasks tab. | No | Not Used by QB. |
| TaskCategory | The Task Category that the task is associated with. This comes from the Tasks tab. This is the Item Category in QuickBooks. | No | Import these first using the task category export file. |
| Industry- TaskCategory | This is the result of combining Industry and Task Category. They are separated by a colon and a space. Example: HVACR Service: Thermostats & Accessories | No | Industry field + Task Category field separated by a colon. |
| Inactive | This will be True or False. It can also be blank. If True, the item will be imported into QB but set to Inactive. If blank or Falso, the item will be Active. | No | |
| Common | This is optional. When set to “TRUE”. It can be used in Total Office Manager to set the “This is a commonly used item.” feature, found under the item’s accounting tab. It is okay to leave this blank (empty). That will be the same as False or unchecked in Total Office Manager. | N/A | Not Used by QB. |
| COGS | The total Cost of Goods Sold (COGS) for this task. This includes parts and labor. This may include the added labor cost for a diagnostic fee, if you set one up in the Setup worksheet (tab). | No | This may be mapped to QB’s Estimated Cost field, but it is not necessary. |
| LastRevisedDate | The date of the last time the task was modified by a user. Editing most cells will cause this to change to the current date. | N/A | Not Used by QB. |
| Comments | Enter any information you want here. This can be imported into the Item’s “Details” form. You find it helpful to explain certain things to a technician. | No |
Technical Information for Advanced Users
This section is provided to help those who plan to make customizations to the design and structure of the Excel Workbook. This material was written for those who understand advanced topics related to Microsoft Excel®.
Password Protected
We use Excel’s standard protection methods. We apply a password to all worksheets. The password can be found on the Instructions tab. Please keep it safe. If you change the password, Aptora will not be able to recover it for you.
Macros and VBA (Visual Basic for Applications)
Flat Rate Simple uses macros written with VBA. Under the Developer tab, you will have access to the VBA code. The code includes robust comments to make it easier to understand. Please make plenty of backups before you modify the code or the structure of the Workbook.
Be cautious when renaming Defined Names, constants, and worksheets (tabs). Be careful when inserting new columns. This can change the order of the column headers. Excel does a great job of adjusting formulas and Lambda when you rename something or move it, but the VBA code is not changed. This can result in “Subscript of out Range” errors. If you make these changes, simply replace the old name with the new name in the VBA code.
If you change the password that protects the worksheets, be sure to change the passwords found inside the various VBA routines.
Pivot Tables
Pivot tables can be difficult to locate in Excel. We use one pivot table. It is called PivotTable1 and it is located in the Printed Books tab in the hidden columns AA through AD.
Lambda
The Excel LAMBDA® function provides a way to create custom functions that can be reused throughout a workbook, without VBA or macros. One of the key benefits of a custom LAMBDA function is that the logic contained in the formula exists in just one place. This means there is just one copy of code to update when fixing problems or updating functionality, and changes will automatically propagate to all instances of the LAMBDA function in a workbook.
We use Lambda in the “Printed Book” tab to control the Print Preview functionality. There is a hidden sheet that contains Lambda code called shtLambda.
Errors and Error Logging
Flat Rate Simple includes robust error handling. If an unanticipated error occurs, it should be trapped, and the user will receive a message explaining the error. This should be rare.
All errors are logged in a text file located here: [UserProfile]DocumentsFlatRateSimpleErrors.txt
Flat Rate Simple Related Help Topics
https://www.aptora.com/help/flat-rate-simple/flat-rate-simple-to-quickbooks-import
https://www.aptora.com/help/tom/flat-rate-simple-to-total-office-manager-import

