
Explaining the Inventory Part Item Type and How it is Used in Accounting
Invoice Items – Inventory Part are items you buy, track as inventory, and then resell. Through inventory part items, you can keep track of how many items remain in stock after a sale, how many items you have on order, your cost of goods sold, and the value of your inventory. Note that Total Office Manager does not track inventory through the manufacturing process.
How Your Accounting is Affected
When you setup Inventory Items, you choose the Income account, the COGS account, and the Asset account to use when these items are bought, stored, and sold.
When you receive an inventory part, it’s value increases your asset account for that item (probably an account called Inventory — ask your accountant) and it also increases your Accounts Payable account by the same amount.
When you sell an inventory item, it’s cost is tracked in whatever Cost of Goods Sold account you chose for the item, and the money you made from the sale goes to the Income account you chose.
How to Access the Form
- From the main menu, click Customers | New Invoice Item, or
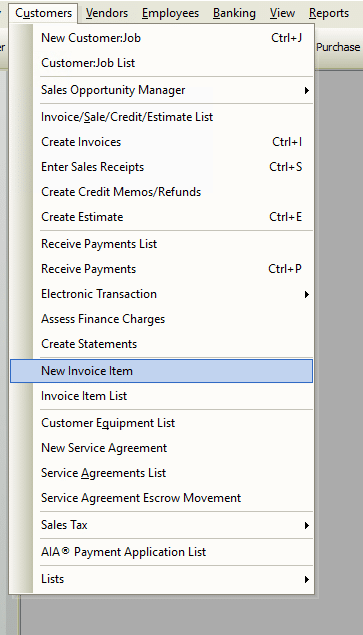
- From the toolbar, click the Add New Item button.

Using the Inventory Part
In short, select an invoice item Type from the drop-down list then complete the necessary fields in that form. Each item type has different fields to complete.
General Tab

- Purchase Description – An item explanation which is used internally when purchasing and replenishing inventory. This description probably contains more industry specs and detail than the sales description.
- Sales Description – An item explanation which appears on sales receipts and invoices. Customers will potentially see this description. It is typically simpler and more straightforward than the purchase description. It should be more sales oriented.
- Estimated Cost – Used to record the expected purchase price of the item. Enter your best guess cost for this item. The software will track the actual cost. Use this for reference and double checking.
- Unit of Measure – Preference must be enabled for use. Allows you to purchase a container and sell by the unit.
- Preferred Vendor – If applicable, choose the favored vendor from which to purchase this item. This will be used when creating purchase orders from estimates and other forms. The Per Preferred Vendor option uses this information to determine what vendor to select for each item that a PO is created for.
- Mfg Warranty – A short field used to jot down basic manufacturer warranty info.
- Bin – Used to record in which bin a smallish part might be stored. For instance, small, blue, 16-guage widgets might be stored in bin G-23. The “Bin” button opens the Item Bins form which is used to record this same sort of bin info for multiple warehouses.
- Bin Setup button – This opens a form that allows you to set a reorder point for each warehouse. You can also enter bin numbers and bin number notes.
- SDS Required – Ticking the SDS Required checkbox indicates that a Material Safety Data Sheet for this item needs to be kept available on file. This field was formerly known as MSDS or Material Safety Data Sheet.
- Markup Method – After setting up your Price Level List and your Inventory Markup Table List, select the means used to markup the inventory part here. The results of the chosen markup method will be proposed in the Suggested Retail Price field. Clicking the Suggested Retail Price button accepts the calculation and copies the suggested price into the Retail Price field.
- Retail Price – Enter the actual retail price to charge for the item. This may be the same as the Suggested Retail Price, or it may be manually entered as any desired amount.
- List Price – This might be the highest price anyone would ever pay. It may also be price supplied by your vendor. There are “Markdown” methods that use List Price to calculate a Retail Price.
- Weight – If known, used to record the weight of the item. Useful for calculating freight if larger volumes are warehoused.
Inventory Tab
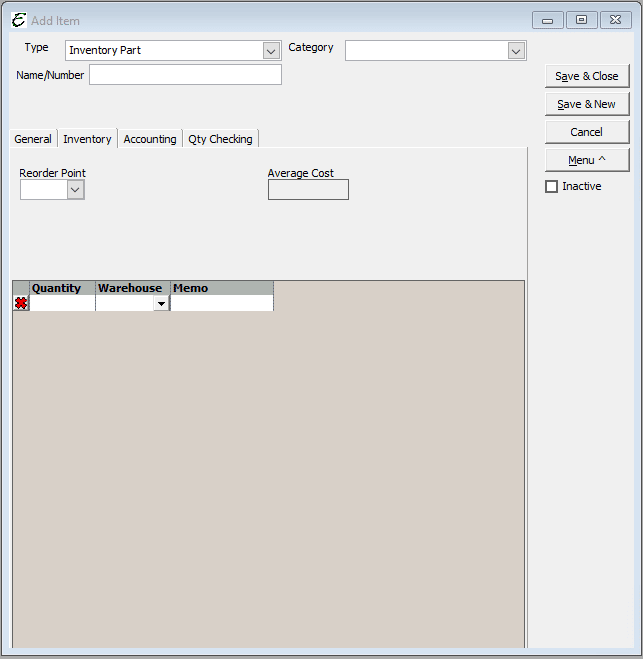
The Inventory tab has two different views. Initially, the view allows direct entry of current inventory data. After the first save, the Inventory tab will no longer accept direct entry of inventory levels. Instead, the tab simply displays current levels. To modify inventory levels after the initial save, use the “Adj Qty OH” button to open Add Inventory Adjustment form designed specifically for that use. After the first save, the “Load” button appears, which refreshes the display to reflect the most recent changes available.
- Reorder Point – When inventory dips below the Reorder Point setting, it will help when doing Inventory Replenishment.
- Department – If the item is typically used in one department rather than an other, the default department for that item is selected from the drop-down list. For instance, if this part was a wall-mounted thermostat, the department HVAC department would probably be picked instead of the Plumbing department. This field is not mandatory and may be left blank. Note: Departments must first have been setup in the program before they are available from the drop-down list.
- Quantity/Warehouse – When setting up a new inventory item for the first time (illustrated below), existing inventory levels can be directly entered into the Inventory tab using the Quantity/Warehouse table. Simply enter the number of items on hand in the Quantity field, then select the appropriate location using the Warehouse drop-down button. Note: Warehouses must first have been setup in the program before they are available from the drop-down list.
- Average Cost – Displays the historical average cost paid over the lifetime of the item, unless the item inventory ever reaches zero. When the inventory of an item reaches zero, the average cost is reset.
- Back Ordered – Displays any current back-ordered quantities.
- Load – Refreshes the inventory display with the most current data.
Accounting Tab

The Accounting tab is used to setup item defaults related to accounting, tax code usage, and pop-up notes.
-
- Income Account – Based on your accountant’s recommendation, choose which of your income accounts to use when a sale of the item occurs.
- COGS Account – Based on your accountant’s recommendation, choose which of your Cost Of Goods (COGS) accounts to use when a purchase of the item from a vendor occurs.
- Asset Account – Based on your accountant’s recommendation, choose which of your asset accounts to use when you receive into your possession delivery of this item. Many companies use an asset account called “Inventory”.
- Tax Code – Used to set a default tax code for the particular item. This is not a mandatory field and may be left blank if a compelling reason to use it is not found.
- Item Sales Commission – Enter a dollar amount to pay sales commission. Used for the Item Commission method.
Qty Checking Tab

The “Qty Checking” feature is used to setup custom alerts which warn when an attempt is made to sell either too little, or too much of a particular invoice item. See the related topic, “Items – Qty Checking” for detailed information on the feature.
Tips on Inventory Parts
- Items on sales increases income, increase cost of goods, and decreases inventory assets.
- Items on purchases increase inventory assets and increase accounts payable or decrease cash.
- Total Office Manager cannot track manufacturing inventory for products you build and sell. In other words, when you “build” an item from other items, inventory is not relieved when the build is complete. This is often referred to as “Assembly” inventory. Instead, Total Office Manager relieves inventory when the Group item is sold.
Related Content
https://www.aptora.com/help/adding-invoice-items-non-inventory-part/
https://www.aptora.com/help/adding-invoice-items-serialized/

