
Understanding Filters
Many of the lists appearing throughout Total Office Manager share common controls and are used in a similar manner. Most lists which display more than a handful of columns have a Quick Filter as well as a Filter Center. The displayed contents of lists can generally be adjusted, sorted, and selected the same way. Filters provide a way to create working lists for things needing attention. As long as all the criteria is met, the records appear in the filter. Once you learn to create filters to handle most of your daily tasks, managing your workflow processes will become easier. This topic will focus on the use of List Management – Filter Center in Total Office Manager.
Filter Center Components
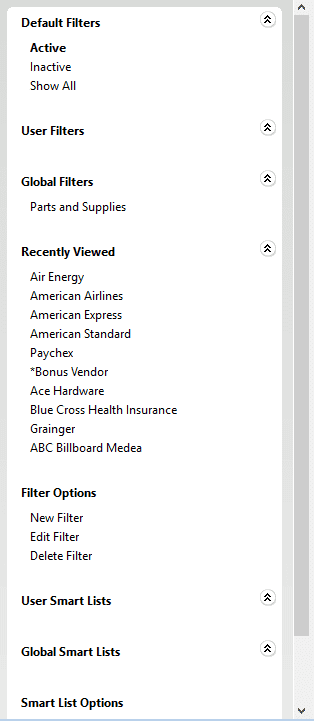
The Filter Center is used to access built-in filters and to manage custom filters. Filters allow you to sort information quickly and efficiently based on the criteria you deem pertinent. The lists created when using filters will fluctuate based on the most current information available. The Filter Center in most lists is comprised of the following five components:
-
Default Filters – Default Filters provide easy access to commonly-used filters. Default Filters vary from list to list depending on the type of list and it’s contents. Default Filters are hard-coded in the program and are not editable by the user.
-
User Filters – User Filters are custom filters previously designed and setup by a user of the program. User Filters appear only to the user who created the filter, thus not cluttering up other user’s filter centers with inappropriate filters.
-
Global Filters – Global Filters are custom filters previously designed and setup by a user of the program. Global Filters appear to everyone, regardless of who created the filter, thus allowing important filters to be “shared” and appear in other user’s filter centers.
-
Recently Viewed – The Recently Viewed component, displays the last ten records accessed by the logged in user. Simply click on a listing to open that record.
-
Filter Options – The Filter Options component is used to create and manage both User Filters and Global Filters. See the section, “Creating Editing, and Deleting Custom Filters” below for more information.
Creating, Editing, and Deleting Custom Filters
The Filter Options component of the List Management – Filter Center is used to create new filters, edit existing filters, and delete old filters.
Creating a New Custom Filter
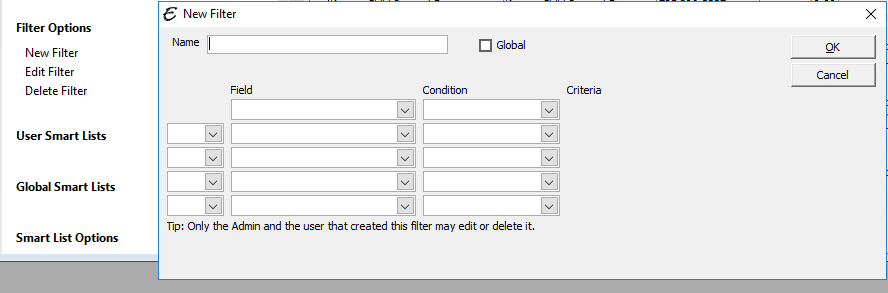
- Go to the Filter Options component of the Filter Center and click “New Filter“. The “New Filter” window will appear.
- Enter a filter name in the “Name” field.
- Make a selection from the “Field” drop-down box. For instance, if you wanted to filter on those who live in Kansas City, you would choose “City” from the drop-down box. Not every field in the list is available in the Field column. Note that the “Criteria” column appears only after making a selection from the “Field” drop-down box.
- Choose a condition on which to filter, from the “Condition” column.
- Enter the data on which to match in the “Criteria” column.
- Set the “Match” field to either “All” or “Any” as applicable.
- The “All” setting means the results must match all filter conditions.
- The “Any” setting means the results only have to match any single filter condition. In the example above, only being a residential customer is enough to appear as a result, because ANY single condition has been met. Likewise, only being on credit hold is enough to appear as a result, because ANY single condition has been met here as well.
- Tick the “Global” checkbox as applicable. When the Global checkbox is ticked, the new filter will appear in the Global Filters area of the Filter Center, for all users to share. When the Global checkbox is left un-ticked, the new filter will appear in the User Filters area of the Filter Center, where only the user who created the filter will have access.
- Click OK to save the filter.
Editing an Existing Filter
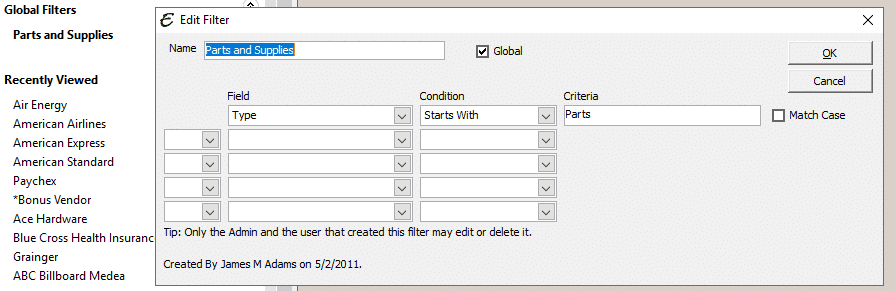
- To Edit an existing filter, first click the actual filter name from either the User Filters or the Global Filters area of the Filter Center. The filter name will turn bold.
- In the Filter Options area of the Filter Center, click “Edit Filter“. The “Edit Filter” window will appear.
- Make any desired changes to the filter properties, then click OK to save the changes.
Deleting an Existing Filter
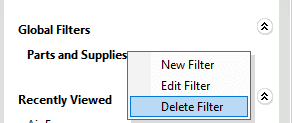
- To delete an existing filter, first click the actual filter name from either the User Filters or the Global Filters area of the Filter Center. The filter name will turn bold.
- Right-click on the selected filter and click “Delete Filter“.
- Or, in the Filter Options area of the Filter Center, click “Delete Filter“. The filter will be immediately deleted from the Filter Center.
- Note: Only the creator of the filter or the administrator can delete a filter.
Tips
- The width of any Filter Center can be adjusted to suit the user’s preference by using the same techniques with the Information Center. To adjust the width, simply place your mouse pointer on the right edge of the Filter Center. When your pointer changes to “split arrows” pointing in opposite directions, click to
drag and drop the Filter Center’s right edge where desired. Just like the Information Center, expand/collapse buttons control display details for each component of the Filter Center. - Filters are not the same as Smart Lists. Read about Smart Lists here.

