
Working with Smart Lists
Many of the lists appearing throughout Total Office Manager share common controls and are used in a similar manner. Most lists which display more than a handful of columns have a Quick Filter as well as a Smart Lists and Filter Center. The displayed contents of lists can generally be adjusted, sorted, and selected the same way. This topic will focus on the use of List Management – Smart Lists in Total Office Manager.
Smart List Components
A Smart List is a list of selected items chosen from the main list for easy access. You can create a Smart List for any purpose you can conceive.
For example, on the Customer:Job list you might create a list specifically for customers who have a history of handling payments badly or VIP’s. With lists such as these, you can quickly see who belongs to certain groups without going to each Customer:Job and viewing notes.
Another example, on the Purchase Order (PO) List, you might create a Smart List to group all Purchase Orders that are associated to a single Customer or Work Order. Since the PO List doesn’t include columns for “WO#” and “Customer:Job”, a Smart List is an easy way to organize items for easy viewing when the List doesn’t include a column for filtering.
These examples are not all inclusive. You can create a Smart List for any purpose you see fit.
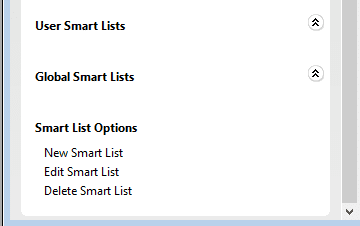
- User Smart Lists – User Smart Lists are custom Smart Lists previously designed and setup by a user of the program. User Smart Lists appear only to the user who created it, thus not cluttering up other user’s Smart List area with inappropriate lists.
-
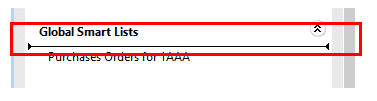
Global Smart Lists – Global Smart Lists are custom lists previously designed and setup by a user of the program. Global Smart Lists appear to everyone, regardless of who created the filter, thus allowing important filters to be “shared” and appear in other user’s Smart Lists areas. Smart Lists can be marked as “global” during creation or by editing any existing list.
-
Smart Lists Options: New – There are two ways to create a New Smart List. You can use the “New Smart List” button to create a list and add items to it later, or you can make your selections (by using Ctrl or Shift+Click) and dragging your selection(s) over to the Smart Lists area. This will prompt the system to create a new List for you to name.
-
Note: It is also possible to “drag & drop” selections when adding to an existing list so its important to understand which you are doing to avoid accidentally adding to existing lists when you intend to create a new one (See below for further detail).
-
-
Smart Lists Options: Edit – Allows you to edit the name of your currently selected Smart List as well as toggle its “Global” status.
-
Smart Lists Options: Delete –Allows you to delete the currently selected Smart List.
Usage
To enable a Smart List, click the name of the list from the Smart Lists area of the list you are viewing. The currently selected Smart List will appear in bold.
To disable a Smart List, click on any other filter option available, such as the default filters (e.g. Show All).
Creating New Smart List
Smart Lists Options: New
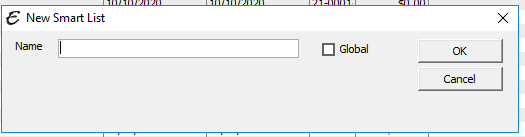
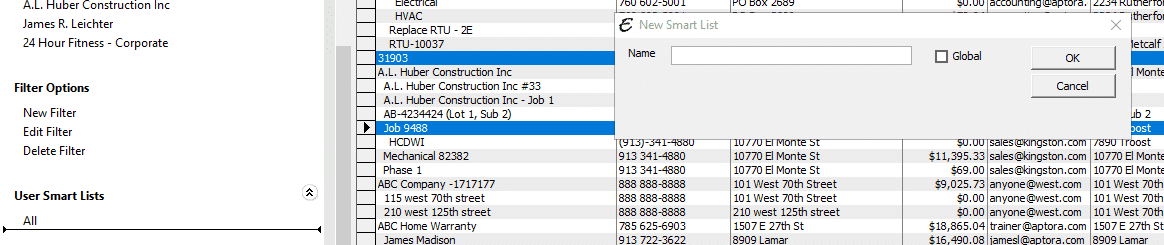
There are several ways to create Smart Lists. You may click on New Smart List under Smart Lists Options. The New Smart List screen will pop-up. Type in a name for your New Smart List. Decide if it should be a Global Smart List or a User Smart List. Hit OK to save.
Once this Smart List is created, you will then need to make your selections to add to the list. You can press Ctrl+Click (to select items one by one) or Shift+Click (to select a range of items) to make your selections. Once your selection is made you can drag your selections from the list to the Smart List area and drop above the Smart List you would like your selection added.
Right-Click Menu
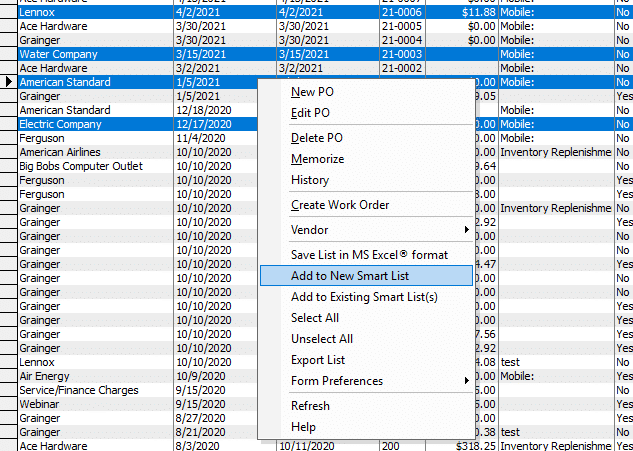
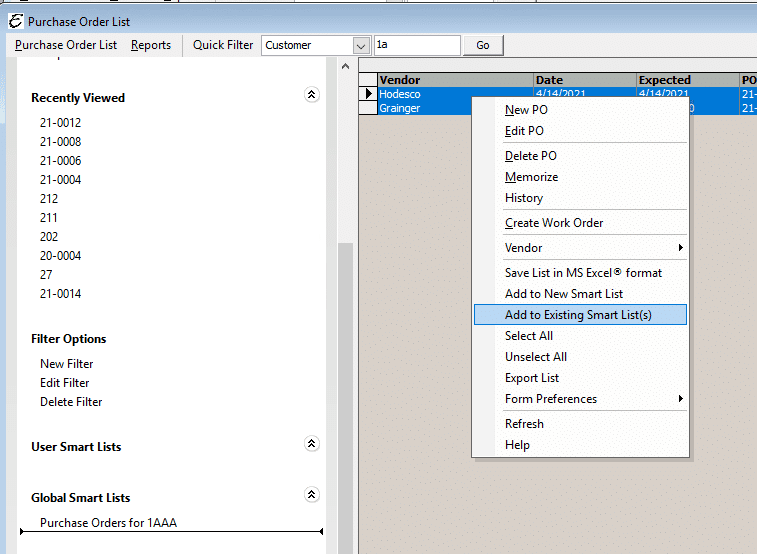
Another way to create a New Smart List is to first make your selection of the items you would like in the list. Right-Click into the List area (for example, Customer: Job List). A menu will pop-up. Choose Add to New Smart List.
Drag to User or Global Smart List Area
You can press Ctrl+Click (to select items one by one) or Shift+Click (to select a range of items) to make your selections. Once your selection is made you can drag your selections from the list to the Smart List area and drop below the Smart List you would like your selection added. When you create a new list, a line will appear at the bottom of all available lists, indicating a new one is going to be created. After dragging over, the New Smart List screen will appear to add a ‘Name’.
Adding To Exiting Smart Lists
You can add to existing Smart Lists in any of the following three (3) ways:
Drag And Drop
Select one or more items on your list and drag and drop them above to the Smart List you would like to add them to on the Filter Center.
If you want to add to an existing list, put your mouse cursor next to it. A line will appear above the name of the name of the list. The list the line appears above is the list that your selections is will be added to.
Right-Click Menu
Select one or more items on your list and right-click. A menu will appear and will include an option to “Add To Existing Smart Lists”.
Add to Existing Smart List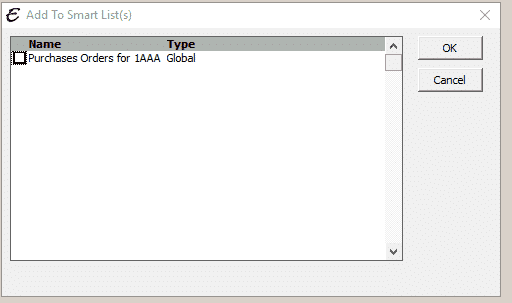
Select an Existing Smart List
List Menu
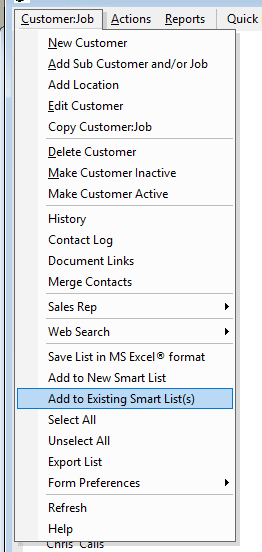
Each list contains a list menu at the top left of the list. Click on the List Heading in the top left corner and choose “Add to Existing Smart List(s)”.
When you use the “Add to Existing Smart List(s)” option, a new Window will appear, allowing you to select one ore more Smart Lists to add your selections to. Click the check box next to any the Smart List(s) you want to add to and click [OK].
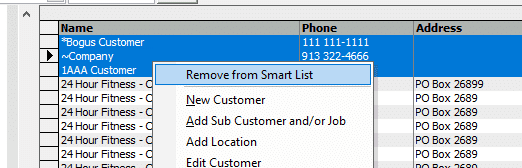
Remove From Smart List
To remove items from Smart Lists, activate the Smart List and select all items you want to remove. Right-click (or use the list menu) and choose “Remove From Smart List”.
- Be careful not to use the “Delete” option. Delete actually deletes the item entirely and it cannot be recovered. If want to remove it from the Smart List, use the “Remove From Smart List” option. Aptora cannot recover deleted items. You will need to re-enter anything that has been deleted.
Tips
- Smart Lists can be used in conjunction with the Quick Filter.
- Smart Lists are not Filters. These lists are not based on search criteria needed for filters.
- Smart Lists do not work in conjunction with User/Global Filters.
- All users are able to add items to and remove items from Global Smart Lists. However, only the creator is allowed to Edit or Delete the list itself.

