
How to Make Lists and Forms Faster in Eight Simple Steps
If your lists and forms are slow, unresponsive, or freeze, this article is for you. We will tell you how to easily make the software faster with ten actionable changes you can make right now.
Spoiler Alter: Steps #1 through #3 will take about three minutes and likely make a considerable difference in speed.
The various lists in Total Office Manager can get very large. A Customer or Work Order list might have hundreds of thousands of records. Depending on what columns you are including in that list, sorting, searching, and filtering can become slow. We offer numerous features that will help speed up the performance of your lists.
1. List Speed Optimization (do this first)
Hide Slow List Columns
TOM was first released in 2004. Since then, we have added hundreds of additional columns to the dozens of lists inside the software. Most of those columns load quickly, while others do not. Some columns can add a lot of extra processing time to opening, searching, and sorting filters.
Example: The Customer:Job list allows users to include a column called Financial History (Yes or No). To provide this information, TOM must query every row on that list, one at a time, to see if that contact has any financial related records. This information might be handy to have but displaying it comes at a cost to speed. Not every user needs this information and can do without it.
This procedure will hide all the columns that require extra processing time for all users. Each user can always add back columns they really need themselves. Most users will never notice the columns are missing but may notice the software working much faster.
- From the main menu, click Edit | Preferences | Appearance | Company Preferences.
- Look for a button called “Hide Columns that Significantly Slow List Performance” and click it.
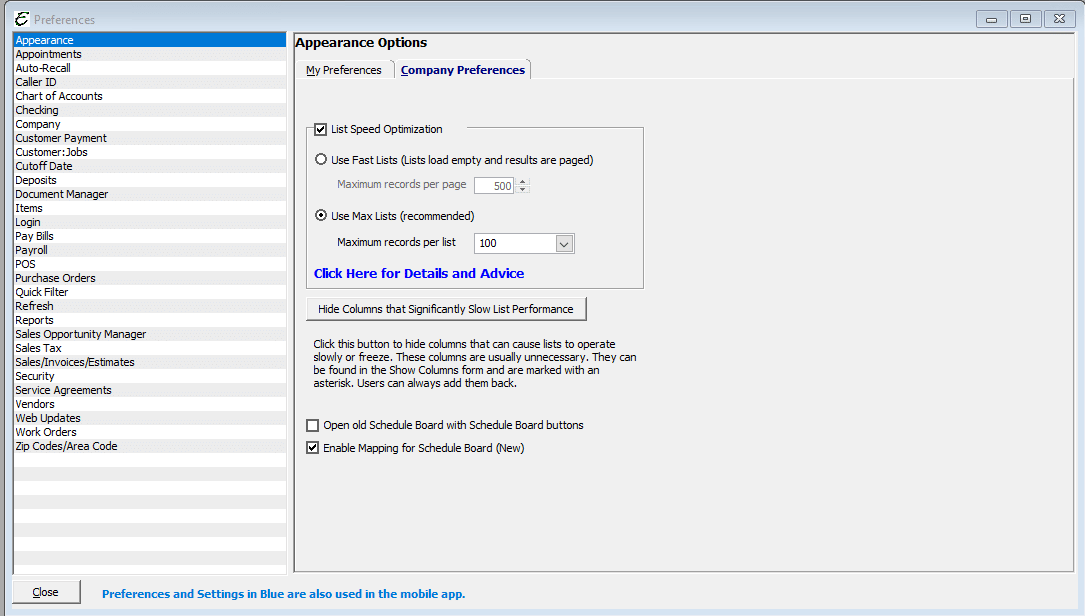
This process unchecks the boxes needed to hide these columns for all users. Users may still add those columns back if they wish. You can perform this procedure any time you need to. Note: If a form is opened when you perform this action, the form will need to be closed and reopened for the changes to take effect.
You may also remove columns on an individual basis from each list. See this help topic for more information.
2. Database Performance Maintenance (do this second)
Re-index Your MS SQL Database (Company File)
This tip is for NON-HOSTED clients only. We take care of this in the hosted environment. You can still do this yourself though.
When all or most people are out of the software, go to File | Company File Information | Database Stats. Click the Run Database Maintenance
For more information, please see this topic based on Database Configuration, Maintenance, and Backups.
- From the Main menu, click File > Company File Information.
- Go to the Database Stats tab. See if the Compatibility Levels are the same. If they are not, ask your IT pro for help. This topic could help them: https://www.aptora.com/tips/database-maintenance/
- Check the Indexes to Rebuild and Indexes to Reorganize fields. They should be around 50 or less. Regardless of their value, click the Run Database Maintenance button. Click the Refresh button or close the form and reopen it to make sure the values are refreshed. Now the entire database should respond faster.

2a. Set Your Database Compatibility Level (advanced tip)
This tip is for NON-HOSTED clients only. We take care of this in the hosted environment.
This tip could cause a huge speed improvement. This tip is for advanced IT people only. Open Microsoft SQL Server Management Studio. Check the Compatibility Level setting. It needs to be as high as it will allow. You should notice an immediate speed improvement and even more improvements over the course of about one or two weeks.
Important: Make sure that Total Office Manager and Aptora Mobile II are BOTH updated to the latest version before changing this setting.
3. Adjust Form Refresh Settings (do this third)
Once you perform steps one through three, you may notice a considerable difference. Note, if you are hosted by Aptora, we take care of this step for you each night. It is okay to proceed with this though.
- From the main menu, click Edit > Preferences.
- Click Refresh > Company Preferences
- Locate the Auto Refresh Changed Lists option and uncheck that box.
If you feel that you must have this option checked, we recommend 180 seconds or more.
Why: A forced refresh is often unnecessary and may create a large load on your database and network. This form has a label that explains why this is helpful and why you likely do not need this turned on.
Important Note
Users can still add these columns back to their lists. This might be needed for some users but not necessary for others. We recommend that you periodically use this utility to remove columns from users. They will add them back, if they really need them. Most users will never even know they are gone but may notice the speed increase.
4. Using the Max List or Fast Lists Feature
Both features mainly work by limiting the number of records shown in the lists. Fast Lists create pages and Max Lists limit the number of records in the list. Think of it this way, when you go to a shopping website like Amazon® or Ebay®, you are not shown their entire product list. You select a category or perform a search. The results are limited to a set number. If you have too many results, you narrow your search criteria.
We generally recommend Max Lists over Fast Lists.
The Max Lists Feature
This is generally the option we recommend for speed list optimization.
The Max Lists feature was designed to make the process of searching through excessively large lists (such as the Customer:Job List for large companies) faster. It works by limiting the number of records that are displayed in a list. The user decides how many records will be displayed.
Enable Max List
To use the Max Lists feature you must first enable it in Preferences. You must have permissions in security to access this preference. This preference will apply to all users. Here is how to turn on Fast Lists”
- Click Edit | Preferences | Appearance | Company Preferences.
- Check the List Speed checkbox and select the Use Max List radio button.
- In the “Maximum records per list” box, select how large you want your pages to be. We generally recommend 100.
The Fast List Feature
The Fast Lists feature was designed to make the process of searching through excessively large lists (such as the Customer:Job List for large companies) faster. It works through pagination (organizing the contents of the list into pages). With this feature turned on, you might have fifteen pages to tab through rather than one very large list.
Enable Fast Lists
To use the Fast Lists feature you must first enable it in Preferences. You must have permissions in security to access this preference. This preference will apply to all users. Here is how to turn on Fast Lists.
- Click Edit | Preferences | Appearance | Company Preferences.
- Check the List Speed checkbox and select the Use Fast List radio button.
- In the “Maximum records per page” box, enter how large you want your pages to be. We generally recommend 500.
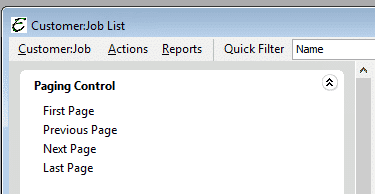
Using Fast Lists
Your lists will now include four new buttons at the top left called First Page, Previous Page, Next Page, and Last Page. Conduct your search as normal. Use those buttons to move through the various pages of search results.
Fast List Tips
- When sorting a list, you will be sorting ONLY the records visible in the lists. For most users, this is not an issue.
- When you open the list, right-click, click Open List in MS Excel, the Max List feature will export the entire list of active records, regardless of how many are being displayed on those lists.
- User Filters will search the entire record set (all pages).
- When you open a Fast Lists enabled list, such as the Customer:Job list, Work Order list or Invoice/Sale/Credit/Estimate list, it will load blank. This allows the window to open more quickly and enables you to use the various filter options (i.e. User Filters, Quick Filter, etc.) to more quickly search through the lists as it will only load what you need and none of what you don’t. However, you are still able to use the Default Filter to “Show All” and load your entire list.
- With Fast Lists enabled, the lists include “paging” options. Imagine you have a Customer:Job list with 300,000 records. Instead of trying to load all 300,000, the list will only load a certain amount per page (set by the user). You will be able to open, search, filter, and sort much faster than before.
- When you activate Fast Lists for the first time, the feature will hide certain columns, found in certain lists. These columns are ones that slow down your lists because they perform calculations each time the lists are opened, sorted, filtered, or searched. There are not many of these columns and you can always reactivate them. For example, in the Customer:Job list click the Customer:Job menu in the upper left side of the form. Now click Form Preferences | Show Columns. These are columns whose names end with an asterisk, such as Financial History*. Max Lists does not do this. Your column selections are not changed.
- When sorting a list, you will sort the entire list (all records, from all pages) and return the sorted results.
- User Filters will search the entire record set (all pages).
Disadvantages of Fast Lists
- When you open the list, right-click, click Open List in MS Excel, only the results of that page are exported. The Max List feature will export the entire list of active records, regardless of how many are being displayed on those lists.
- When Fast Lists is enabled, the Customer:Job list will load in “Flat” view. That is, it will display Parent:Child relationships with the parent name, a colon, and then the child name. (Ex. Megamart and Megamart:Store1). Max Lists does not have this issue.
5. Faster Customer:Job History
- Click File | Preferences | Customer:Jobs | My Preferences.
- Look for the “Show Balance on Sales Tab in the Customer History Form” and consider unchecking that box.
The process of calculating and displaying that value can slow down this form. If you do not need this information, uncheck the box.
6. Load Customer:Job List Form Faster
- Go to Preferences | Customer:Job | My Preferences.
- Check the “Load the Customer:Job List Empty
The Customer:Job List form will open without loading the entire Customer:job list. You can still search as usual.
Note: If you are using the Max List or Fast List feature, this may not be as effective and not needed.
7. Load Customer Related Forms Faster
When you open a form to edit it, the entire Customer:Job list is loaded. This to make changing the customer faster. If you rarely change the customer, you do not need this list preloaded.
- Go to Preferences | Customer:Job | Company Preferences.
- Check the box called Do Not Load Customer:Jobs on Add
- Check the box called Do Not Load Customer:Jobs on Edit
Forms will open without loading the entire Customer:job list. You can still change the customer by clicking a Load List option.
8. Other Important Speed Tips
The following is a list of ideas and settings that should make your Total Office Manager operate faster. These tips are presented (roughly) in the order of importance.
Do NOT Connect Your Computer Wirelessly
Total Office Manager needs a fast network connection and wireless is rarely ever fast enough. Connecting with Wi-Fi can be 1/9th the speed of a wired connection.
Important: Some desktop computers will try to connect to your network wirelessly even when they have a network cable plugged into them.
Faster Customer:Job History
Click File | Preferences | Customer:Jobs | My Preferences. Look for the “Show Balance on Sales Tab in the Customer History Form” and consider unchecking that box. The process of calculating and displaying that value can slow down this form.
Load Customer:Job List Form Faster
- Go to Preferences | Customer:Job | My Preferences.
- Check this option: Open the Customer:Job List Empty. Why? Most users are going to do a search anyway. There is no reason to wait around for it to load.
The form will open with no information. You can still search as usual.
Do Not Load Customer:Job List on Edit
When you edit a work order, invoice, and other forms that include a customer:job selection, the entire list is populated. That list takes time to load, and many users are not typically changing the customer:job.
- Go to Preferences | Customer:Job | Company Preferences.
- Check the Do Not Load Customer:Jobs on Add/Edit (form loads faster) checkbox.
If you need to change the customer:job, there is a Load option at the top of the selection dropdown list.
Load List Forms Faster
Select the “Show Active” Default Filter on all List Forms.
This automatically loads Active Records only which limits the amount of data to load when opening any List Form in the software.
The Default Filter is remembered by the User and will load information based on what was last selected in each list.
Make Forms Load and Save Faster
Any form that has an Item tab or an Expense tab, typically includes preferences to add or remove columns. These include Invoices, Sales, Estimates, Bills, Credit Card Charges/Credit, Checks, and more. By removing columns that you do not need, you can make the form open and save faster. For Example:
Open an Invoice > click Menu > Form Preferences > Uncheck unnecessary columns.
Update Your Software
We are constantly working to make the software faster. That seems to be what users want the most. (This tip is for NON-HOSTED Clients). If you have not updated in a while, please consider updating. If you are nervous about the update breaking something, contact helpdesk@aptora.com for advice on how to proceed.
Network Speed Testing
Be sure to have your network and network cables tested by a professional. We have seen a lot of problems such as faulty cables, ports, and switches. Most of our users underestimate this as a possibility. Please double-check.
Bulk Inactivation
Go to Tools| Utilities| Bulk Inactivation. This allows you to Inactivate multiple Customer:Job Accounts that you no longer need or wish to see as Active. This will speed up forms that load the Customer:Job List for selection as well as the actual Customer:Job List.
Remove Unused Items
Go to Tools| Utilities| Item Cleanup Unused. This allows you to Bulk Inactivate or Delete any unused Invoice Items. This will speed up forms that load Invoice Items for selection as well as the actual Invoice Items List.
Merge Duplicate or Unneeded Accounts
Go to Tools| Utilities| Merge Chart of Accounts. This allows you to Merge Chart of Accounts of the same Type for duplicate accounts or simply condensing the List. This will speed up forms that load Chart of Accounts for selection as well as the actual Chart of Accounts List.
To Speed Up Write Checks Form
Go to Preferences| Checking| Company Preferences.
Check the option that says, “Do Not Include Any Cust:Jobs in Checks Pay To List”.
This will speed up the Write Checks form by limiting the data displayed in the Pay to the order of selection.
To Speed Up the Enter Bills Form
Turn on the Auto Recall option Go to Preferences | Auto-Recall | My Preferences. Check “Auto-Recall Transactions”. This will make the New Bill form load faster and auto-populate that Vendor’s last Bill information.
Inactivate Unused Records
Inactivate Customers, Invoice Items, Vendors, etc. that are no longer used.
Close Unnecessary Forms
When using the software, do not keep unnecessary windows open that are not a part of your workflow.
Click Preferences > Appearance > Show Information Center > Uncheck the Show Information Center box.
Hide the Information Center
It takes time and processor cycles to reload this information. Hiding this reduces network load and maximizes screen real estate.
Faster Software Updates
Speed up your software updates by sharing the update file. To do this, you will need to be logged in as the Administrator. From the main menu, click Edit | Preferences. Select the Web Updates tab and click the Company Preferences tab. Select an update file path. This is a location where the update will be stored. This makes updates faster because once the update has been downloaded; all other software users will have access to it, rather than downloading it from the internet.
Delete Unnecessary Zip Codes
Total Office Manager includes a database of approximately 50,000 zip codes covering the entire nation. Any form that uses a zip code loads all of these when the form opens. Remove the zip codes that you do not need. Click Tools | Zip Codes. Delete zip codes that don’t apply to you and are not part of your service area. This will make zip code selection faster. Forms that include a zip code field will load faster.
IMPORTANT: Scheduled Database Maintenance
Be sure that you have set up regular MS SQL Server database maintenance. This includes backing up and re-indexing your database file from within SQL Server Management Studio.
Related Content
Database Configuration, Maintenance, Optimization, and Backups Tips
https://www.aptora.com/tips/search-tips-for-lists/

