Customer and Vendor Payment Terms List
The Payment Terms List is used to setup and manage payment terms in Total Office Manager. These include both terms offered from you to your customers to encourage quick pay on their A/R invoice balances, as well as terms offered from your vendors to you to encourage payment toward their bills.
Form Access
-
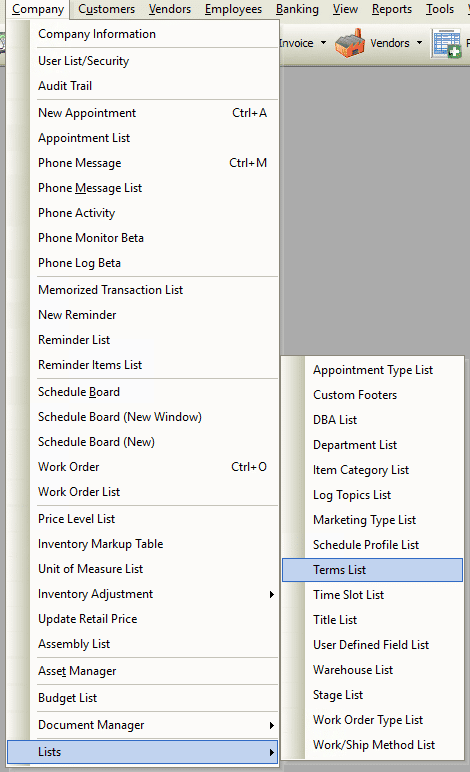
From the main menu, click Company | Lists | Terms List.

Usage
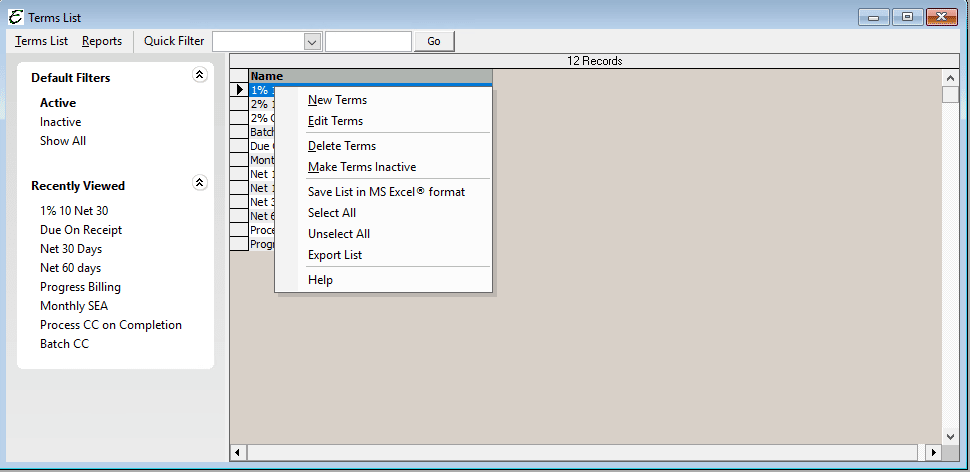
Perhaps the easiest way of using the commands available in the Payment Terms List is through its right-click menu.

- To create new terms, right-click anywhere in the list and choose New Terms from the pop-up menu.
- To edit a term, right-click on it and choose Edit Terms from the pop-up menu.
- To delete a term, right-click on it and choose Delete Terms from the pop-up menu.
- Note: It may not always be possible to perform this action — inactivation may be more appropriate.
- To inactivate a term, right-click on it and choose Make Terms Inactive from the pop-up menu. This can also be done by ticking the “Inactive” checkbox within a terms record (see the Customer and Vendor Terms form, below).
- To export whatever information is currently displayed in the list, right-click anywhere in the list and choose Export List from the pop-up menu.
Creating New Terms

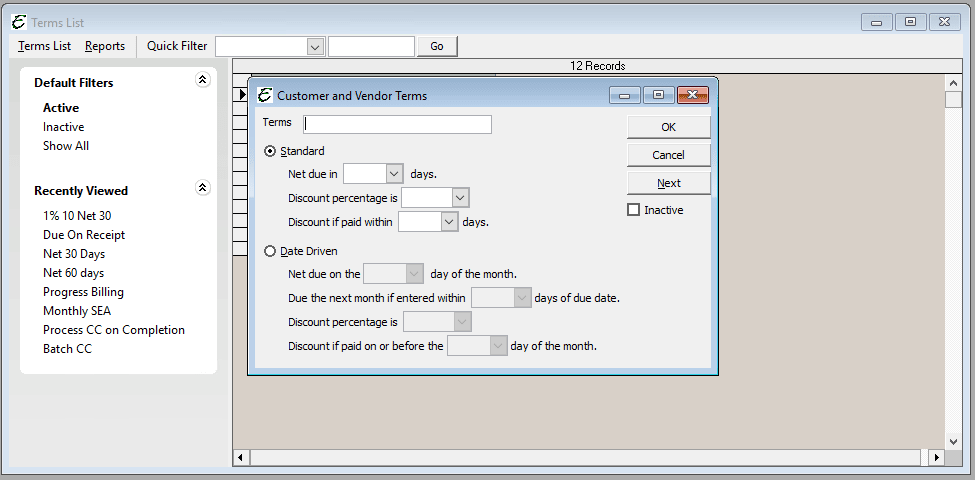
- Right click anywhere in the Terms List and choose New Terms from the pop-up menu. The “Customer and Vendor Terms” form will appear.
- Enter a name for the new term in the “Terms” field (2% 10 Net 30, or Net 30 Days, for example).
- If the terms are of the “standard” variety, click the “Standard” radio button, then complete the applicable fields to define the nature of the standard terms.
- If the terms are date driven, click the “Date Driven” radio button, then complete the applicable fields to define the nature of the date driven terms.
- Click the OK button to finish and close the form, or click the Next button to save the new terms and go on to create another.
Explanation of Common Terms
Terms are a shorthand way of expressing when you expect to receive payment from a customer, or when a vendor expects to receive payment from you. Terms show the number of days (or date) by which payment is due, and can include a discount for early payment. Example. 1% 10 Net 30 Days means “Payment due in 30 days with a 1% discount if paid within 10 days”.
- 2% 10th Prox Net 30 Days – Payment due in 30 days with a 2% discount if paid by the 10th of the following month.
- Net 10th Prox – Payment due (no discount offered) by the 10th of the following month. This is used for date driven terms only, to handle cases in which invoices or bills are issued just prior to the due date. If the invoice or bill is issued within the number of days you enter, payment is not due until the following month.
- Due on Receipt – Total payment due (no discount offered) as soon as you receive the invoice or bill.
- Net 15 Days – Total payment due (no discount offered) 15 days from the invoice date.
Standard vs. Date Driven Terms
- Standard – Payment is due within a specific number of days from the invoice date. In the New Terms window, you would click “Standard”.
- Date Driven – Payments are due on a certain day of the month (Example: 25th day of the month). To let Total Office Manager know that “25” means the 25th day of the month and not “25” days after the invoice date, you would click Date Driven in the New Terms window.
FAQ
Q. Where does the terms information come from and where is it used?
A. That information is determined by three pieces of information. Terms are setup to be used by both customers and vendors in Total Office Manager (same list of terms are used by both). When the vendor is setup, a Term is selected. That becomes Total Office Manager’s default Term for that Vendor. When a bill is created, the Term is populated automatically on that bill or can be changed by you. Once a term is selected, the due date and discount is populated. The actual amount of the discount will appear when the bill is being paid.
Tips
- A single term can be used in both accounts payable and accounts receivable. Each term needs to be setup only once.
- To apply terms to a transaction, select the terms you want from the Payment Terms List when you are creating an invoice or entering a bill.
- When setting up a new customer, enter the terms offered to that customer in their Additional Info tab. These terms will automatically be proposed when creating a new sales form for the customer, and tracked when receiving payments from that customer.
- When setting up a new vendor, enter the terms offered from that vendor in their Additional Info tab. These terms will automatically be proposed when entering new bills from the vendor, and tracked when paying bills to that vendor.
Related Content


