

How to Set Up and Manage Customer and Vendor Payment Terms
This topic will cover setting up, editing, deleting, and inactivating different payment terms used within Total Office Manager.
Usage
Terms refer to the payment options offered to you by your suppliers or vendors. It also refers to payment terms YOU offer your own customers.
Use this form to create payment terms. Once you have your terms list compiled, you will be able to apply terms to your vendor bills or customer’s invoices.
Explanation of Each Term
Terms are a shorthand way of expressing when you expect to receive payment from a customer, or when a vendor expects to receive payment from you. Terms show the number of days (or date) by which payment is due, and can include a discount for early payment.
Examples:
- 1% 10 Net 30 Days: “Payment due in 30 days with a 1% discount if paid within 10 days”.
-
2% 10th Prox Net 30 Days: Payment due in 30 days with a 2% discount if paid by the 10th of the following month.
- Net 10th Prox: Payment due (no discount offered) by the 10th of the following month. This is used for date driven terms only, to handle cases in which invoices or bills are issued just prior to the due date. If the invoice or bill is issued within the number of days you enter, payment is not due until the following month.
-
Due on Receipt: Total payment due (no discount offered) as soon as you receive the invoice or bill.
-
Net 15 Days: Total payment due (no discount offered) 15 days from the invoice date.
- Pre-Paid: Use these for scheduled maintenance performed under service agreements or other prepaid activities.
Standard vs. Date Driven Terms
Standard – Payment is due within a specific number of days from the invoice day. In the New Terms window , you would click “Standard”.
Date Driven – Payments are due on a certain day of the month (Example: 25th day of the month). To let Total Office Manager know that “25” means the 25th day of the month and not “25” days after the invoice date, you would click Date Driven in the New Terms window.
Form Access
- From the main menu, click Company | Lists | Terms List. Then, click the Terms List menu and select New Terms.
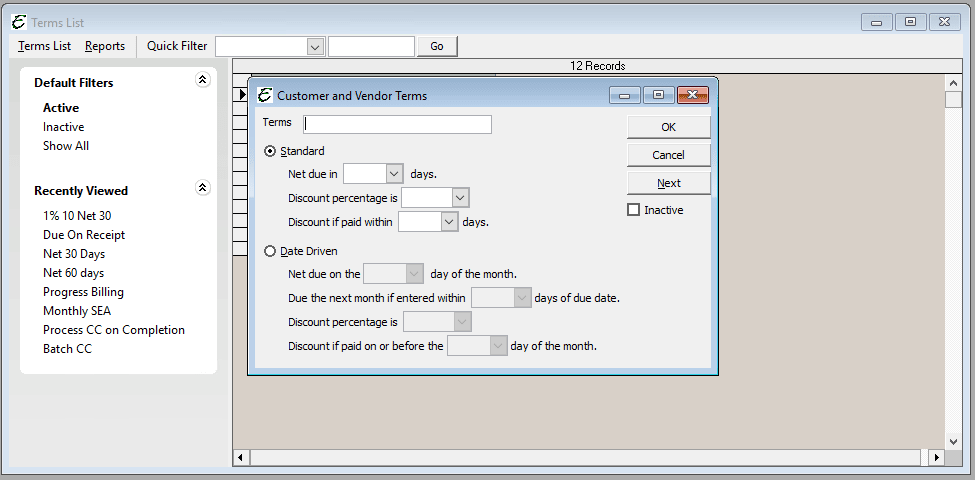
Field Definitions
|
Terms – |
Enter the terms you want to offer to your customer. |
|
Standard – |
Enter the specific number of days, discount offered (if any) and discount date (if any) in which the payment is due. |
|
Date Driven – |
Enter the day of the month, date of next month (if applicable), discount offered (if any) and the discount date. |
|
OK: – |
Save and close the form. |
|
Cancel – |
Do not save changes and close the form. |
|
Next – |
Will save current entered new term and move to the next new term. |
|
Inactive – |
Check this field if you want a term to be Inactive. |
Step-By-Step
- Open the form.
- To enter a new term, click the Terms button (lower left hand corner of the form) and select New Terms.
- To edit a term, click the Terms button (lower left hand corner of the form) and select Edit Terms.
- To delete a term, click the Terms button (lower left hand corner of the form) and select Delete Terms.
- To inactive a term, click the Terms button (lower left hand corner of the form) and select Make Terms Inactive.
FAQ
Q. Where does the terms information come from and where is it used?
A. That information is determined by three pieces of information. Terms are setup to be used by both customers and vendors in Total Office Manager (same list of terms are used by both). When the vendor is setup, a Term is selected. That becomes Total Office Manager’s default Term for that Vendor. When a bill is created, the Term is populated automatically on that bill or can be changed by you. Once a term is selected, the due date and discount is populated. The actual amount of the discount will appear when the bill is being paid.
Tips
- You can delete multiple terms. To highlight multiple terms, press and hold your CTRL key and click each term. You may also select a range of terms by highlighting the first term in that range, pressing and holding your left Shift Key, and clicking the last term in that range.
- You can select a term and right click for common task.
- Total Office Manager uses terms in both accounts payable and accounts receivable. You only need to add a particular set of terms once to the List.
- To apply terms to a transaction, select the terms you want from the terms list when you are creating an invoice or entering a bill.
- When setting up a new customer, on the Additional Info tab, enter the terms associated with the customer and the terms will automatically fill in when you create a sales form for this customer. The same applies to vendors.
