

Introduction
Did you know you can send an electronic phone message in Total Office Manager and Aptora Mobile II?
This feature allows you to take phone messages for your co-workers, right on your computer. You don’t even have to get up and deliver the message to them. Total Office Manager does it for you.
Use this form to take a phone message or “While You Where Out” message for your co-workers. The message will show up on your co-worker’s computer in the Information Center. They will be able to see at a glance, that a message is waiting for them.
Form Access
-
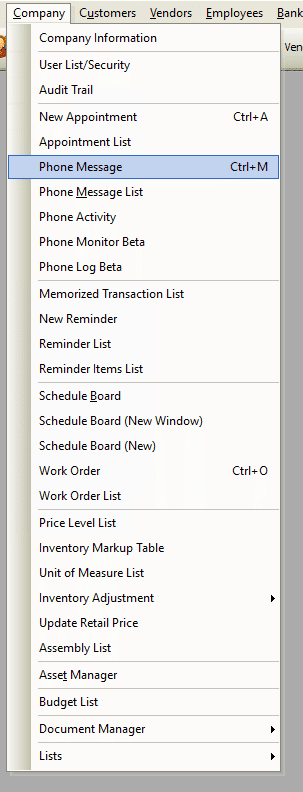
From the main menu, click Company | Phone Message.
-
From the keyboard, use the shortcut Ctrl+M.
-
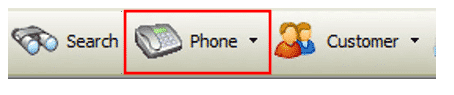
From the toolbar, click the New Phone Message button.
Additional Ways to Create a Phone Message
You can create a phone message using any of the following options:
Total Office Manager
- Under the main menu, navigate to Lists | Phone Messages. Right click on the list and choose the option New Phone Message.
- NOTE: We do not recommend all users have access to this list as it will contain all messages sent. Most users will only need Add and Edit permissions for the messages themselves.
-
Under the main menu, navigate to Company | Phone Message. The master message list is also located here.
-
From the Customer:Job List, navigate to Actions | Create Phone Message.
-
From within a Customer:Jobs record, right click and choose the option Create Phone Message.
-
From the Customer:Job History form, click on the Phone Messages tab, right click and choose New.
-
From the Vendor History form, click on the Phone Messages tab, right click and choose New.
-
From the Employee History form, click on the Phone Messages tab, right click and choose New.
-
If you subscribe to our Caller ID functions, from the Phone Monitor (analog) or Phone Activity Monitor (VOIP), click on the Phone Messages tab, right click and choose New.
Aptora Mobile II
-
From the Dashboard, click on Phone Messages then the plus sign to add a new message.
-
From the Dashboard, click the Hamburger Menu | Quick Add | Phone Message.
Usage
-
Send a message from a customer to a technician in the field or from the field to the office. Perhaps a customer has a question about their balance and would like to speak with accounting. A technician could put in a phone message to receivables. This notification would popup on their desktop once received.
-
Use it to request time off. Employees could correspond with HR indicating the days they wish to be off for vacation or scheduled doctor appointments.
-
If you want to send another user a note to review an account, call a vendor, check into a schedule, etc.
-
Coworkers kid’s school is on the phone again because they forgot their homework or gym shorts…..
Receiving a Message
Unread Messages can be found in two places – the Information Center and the Status Bar.
Information Center
When activated by a user, the Information Center alters you to any Unread Messages and provides a link to open the correspondence.
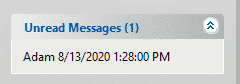
Status Bar
If you look along the Status bar on the bottom of Total Office Manager. Any unread messages will appear in parenthesis. Click on the ‘Unread Messages’ box for the list to appear in a new window.

Field Definitions and Menu Commands
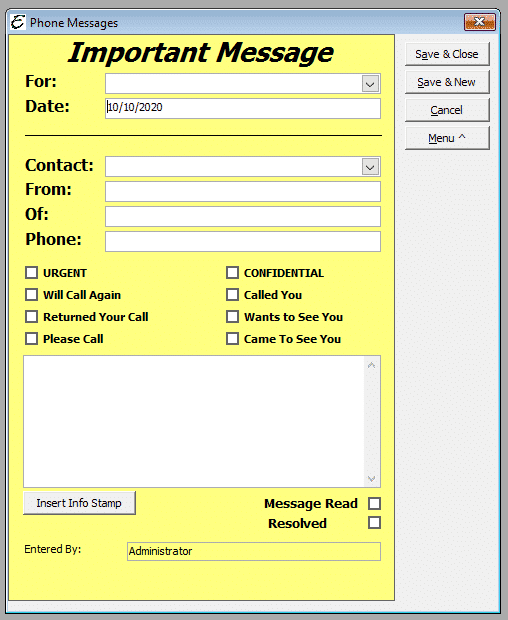
- For: – Select the name of the message recipient.
- Date: – The date and time will populate in this field for automatically.
- From: – Enter the name of the person who is leaving the message.
- Of: – Enter the name of the company or organization the caller is representing.
- Phone: – Enter the caller’s phone number.
- Message Attributes – Tick the appropriate checkbox to mark the message as.
- URGENT
- Will Call Again
- Returned Your Call
- Please Call
- CONFIDENTAL
- Called You
- Wants To See You
- Came To See You
- Message Area – Enter other message details.
- Insert Info Stamp – To enter the user name, date, and time into the message area, click this button.
- Entered By – Automatically displays the name of the person who took the message.
- Message Read – Ticking this checkbox marks the message as being read by the recipient.
- Save & Close – Saves the message and exits the form.
- Save & New – Saves the message and opens a new blank form.
Menu Options
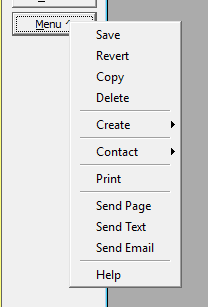
- Menu | Save – Manually saves the form.
- Menu | Revert – Reverts the information in the form to the point of the last save.
- Menu | Copy – Creates a copy of the original message, which can then be send to someone else.
- Menu | Delete – Deletes the message.
- Menu | Create – Select from Appointment, Sales Opportunity or Work Order.
- Menu | Contact – Select from History, Edit, Contact Log, Document Links
- Menu | Print – Previews a hard-copy of the message, which is then available for printing.
- Menu | Send Page – Opens the workstation’s default email editor, with the message ready to email that is received as a page.
- Menu | Send Text – Opens the workstation’s default email editor, with the message ready to email that is received as a text message to the recipient. See ‘Tips’ for more info.
- Menu | Email – Opens the workstation’s default email editor, with the message ready to email.
Tips
- The Email feature can be used to send a message in SMS format to a cell phone. In other words, you can “text” a message to a cell phone from an email application (such as Microsoft Outlook).
- After pressing the Email button, enter the recipient’s cell phone SMS address in the “To” field of the email.
- For example, if a Verizon® customer had the cell number 888-555-1111, just enter “8885551111@vtext.com” in the “To” field of the email message. The message will then be “texted” to the recipient’s cell phone. Contact your various cell phone providers to determine what suffix to add to the end of each cell phone number (like @vtext.com, for example).
- For a list of common carriers and their email addresses for sending text messages, please click here.
