
Introduction
The Vendor Types List is used to manage and classify the various suppliers (vendors) from which you buy goods and services.
Examples Vendor Types:
- Equipment
- Parts
- Computer Repair
- Office Supplies
- Advertising
- Bank/Financial
- Professional
- Government
- Communications
Form Access
- From the main menu, click Vendors | Vendor Type List.

Usage
Perhaps the easiest way of using the commands available in this list is through its right click menu. The right click menu is identical to the title menu.
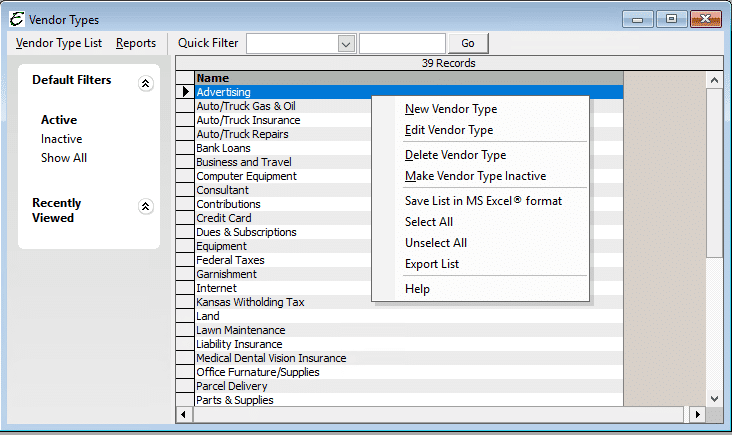
- To create a new vendor type, right click anywhere in the list and choose New Vendor Type from the pop-up menu.
- To edit a vendor type, right-click on it and choose Edit Vendor Type from the pop-up menu.
- To delete a vendor type, right-click on it and choose Delete Vendor Type from the pop-up menu. Note: It may not always be possible to perform this action — inactivation may be more appropriate.
- To inactivate a vendor type, right-click on it and choose Make Vendor Type Inactive from the pop-up menu. This can also be done by ticking the “Inactive” checkbox within a vendor type record (see the Add Vendor Type form, below).
- To export whatever information is currently displayed in the list, right-click anywhere in the list and choose Export List from the pop-up menu.
Creating a New Vendor Type
Follows are the steps for creating a new vendor type.
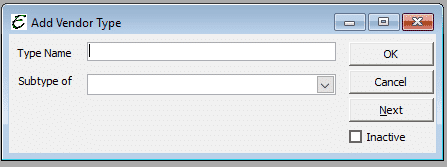
- Right click anywhere in the list and choose New Vendor Type from the pop-up menu. The “Add Vendor Type” form will appear.
- Enter a title in the “Type Name” field.
- If the new vendor type is a “sub” or “child” of another existing type, choose the “parent” type from the “Subtype of” field.
- For example, a computer service company may create a parent vendor type called “Hardware” and setup subtypes for “Cabling/Wiring” and for “Components”.
- Click the OK button to finish and close the form, or click the Next button to save and go on to create another.
Tips
- To inactivate a vendor type from within the Vendor Type form, click the “Inactive” checkbox.

