How to Use Automated Text Messages
Text messages are sent in two ways.
- When the work order status changes by a mobile user (not the desktop), a text is sent to the customer.
- When Reminders are sent the night before the date of the work order.
Sending Text Reminders
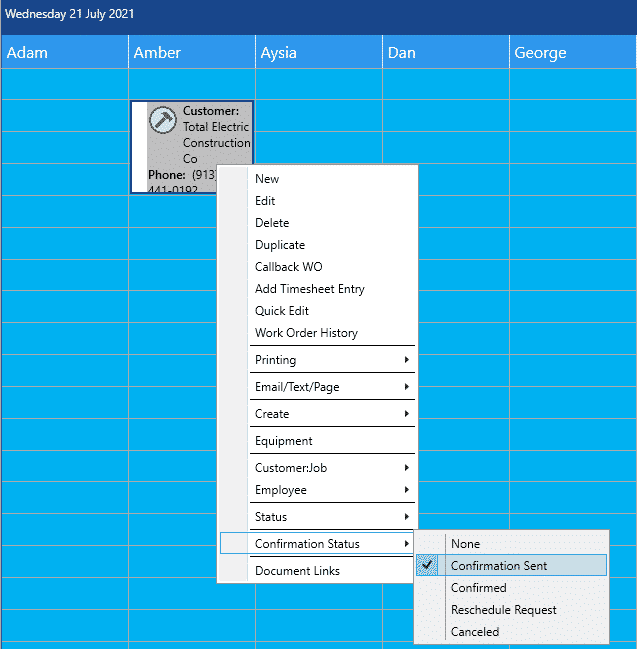
The entire process is automated. When a text reminder is has been sent, the work order Confirmation Status is changed to “Confirmation Sent” on the Schedule Board.
Outbound Reminder text messages are sent every day of the week at 12:00 PM (noon) server time (the time zone of the server that has AMII installed on it). They are sent once per day. There is no way to resend the reminders manually. You cannot change the time the texts are sent.

Points to Remember
- For a reminder to be sent, the work order must have a Status of “Scheduled” and a Confirmation Status of “None”.
- For Multi-Day work orders, a reminder based on the Parent work order Start Date. The reminder will use the parent’s cell phone and Auto Contact Method setting.
- Merge fields are used by adding place holders. These are numbers inside of brackets. For example, [21] is Work Order Scheduled Date. There are about thirty different merge fields to select from. When the message is sent, the placeholder will be replaced with actual data. The reminder will be completely customized to the work order and the technician assigned to it.
- The Outbound SMS Reminder is used for all AMII users. Each user does not have their own reminder. There is nothing to set up for each mobile user.
- Reminders are being sent as SMS. At this time, you are not able to include pictures. This feature will be available soon.
- When you receive a text message from a client, you will be charged for that text in the same way as if you sent that text.
- You cannot use auto texting and auto email options at the same time. The system uses whichever is selected on the Automated Contact Method (can be set to Text, Email, or Do Not Contact). This setting is found on the Customer:Job | Address Info tab.
- The Automated Text Message – Outbound SMS – Reminders template does not offer images. The other templates, that are sent when the status of the Work Order changes, do offer images.
Text Message Responses
Your customers can reply to the reminder text messages you send. This is done in the same way that any text is responded to. Their reply will automate certain tasks in Total Office Manager.
Text replies can be viewed in Aptora Teams.
Text Reply Automation
When the following keywords are anywhere within a text reply, the following actions occur in Total Office Manager. Capitalization is not important but the word must be exact.
“Confirm“: Sets the work order Confirmation Status selection to Confirmed
“Cancel” Sets the work order Confirmation Status selection to Cancelled. Note: The Work Order Status is not set to Cancelled.
“Reschedule“: Sets the work order Confirmation Status to Reschedule Request. An automatic text will be returned to the customer letting them know your company will be calling them to reschedule.
“Stop“: Sets the Customer:Job Automated Contact Method selection to “Do Not Contact”. It does not change the “No Marketing By” properties found in Customer:Job | Additional Info.
“Start“: Reestablishes contact with the customer. This reverses “Stop”. This feature is coming soon.
“Thank you“: If the customer happens to text back any sentence that contains “thank you”, the system will respond with “You’re Welcome”.
Tips
- Set up User Filters on your Work Order List to filter for this activity.
- If the customer responds with something not covered above, the system will text them a message that they do not know how to respond.
Inactivate
If you wish to stop text messages from being sent, remove the account credentials from the Automated Text: Setup. Be sure to notify your Aptora Account Representative to stop the monthly billing, otherwise you will still be charged the monthly fee.

Database (Company File) Limitation
The Automatic Text Reminder system always uses the Database (also called a Company File) that appears first in the Aptora Mobile Configuration utility. Please verify that the Database you wish to use appears at the top of the Database list. To check this:
- Open the Mobile Configuration Utility.
- Click Product Configuration.
- Click Next.
- Look at the Database list.
- If it is not at the top of the list, remove the Databases, and add them back in the proper order.
If you have multiple Databases that you wish to use this feature with, you will need to install multiple mobile websites. If you need assistance with this, please contact our Help Desk for more information regarding system configurations.
Related Content
Aptora Mobile II – Auto Email – Part 1 of 2: Setup
Aptora Mobile II – Auto Email – Part 2 of 2: Usage


